We design and develop a lot of marketing content for Salesforce Commerce Cloud Digital (formerly Demandware). Merchants and marketers need to update websites frequently to engage their customers and keep websites feeling fresh. What exactly is always changing? Product lines, special promotions, loyalty programs, giveaways, individualized content, user-generated content, digital experiences, content marketing pieces, search engine optimization, A/B testing, and the list goes on.
In this article, we’ll look at how to use Commerce Cloud Digital to effectively manage content using content slots. We’ll show how to provide merchants with more control over content using variables. Then we’ll explore a different option for complete control over content code at the sacrifice of administration in Business Manager.
What is a Content Slot?
In Salesforce Commerce Cloud Digital (CCD) a content slot is a defined section of a webpage where content may be injected by a merchant. The slot is defined in the website code and filled by the merchant using the online Business Manager.
In the site code, a slot is created using <isslot>. There are several options that can be attached as attributes as explained in the official documentation. As soon as the code is uploaded to your instance, it appears in Business Manager under Merchant Tools > Online Marketing > Content Slots.
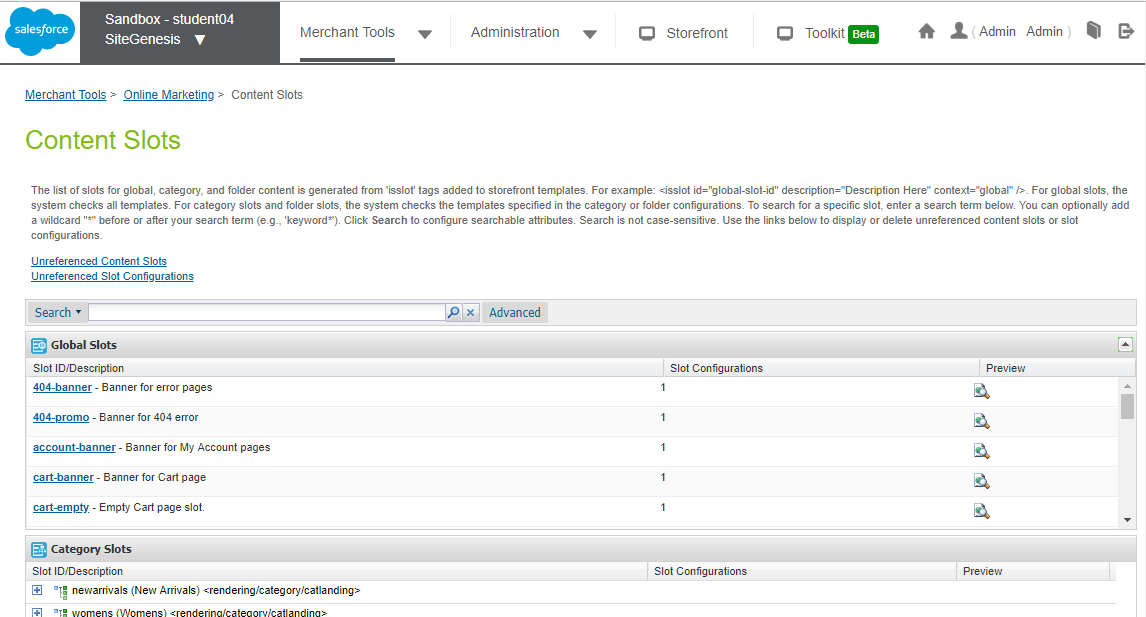
If we click on a content slot, we see a list of the slot configurations for that slot. A configuration defines what will show in that slot and when. For example, your slot could be a space for banners at the top of the site homepage. You could define several configurations, each with a different banner and a different schedule. Perhaps you’d like to show a generic welcome banner as the default. You then add a configuration for showing a fall sseason banner for September-December. You add one more configuration for showing a Halloween sale banner the last week of October. In this way, you can schedule a single slot to show different, relevant content to your customers based on a schedule.
If we add or modify a configuration we see the following options:
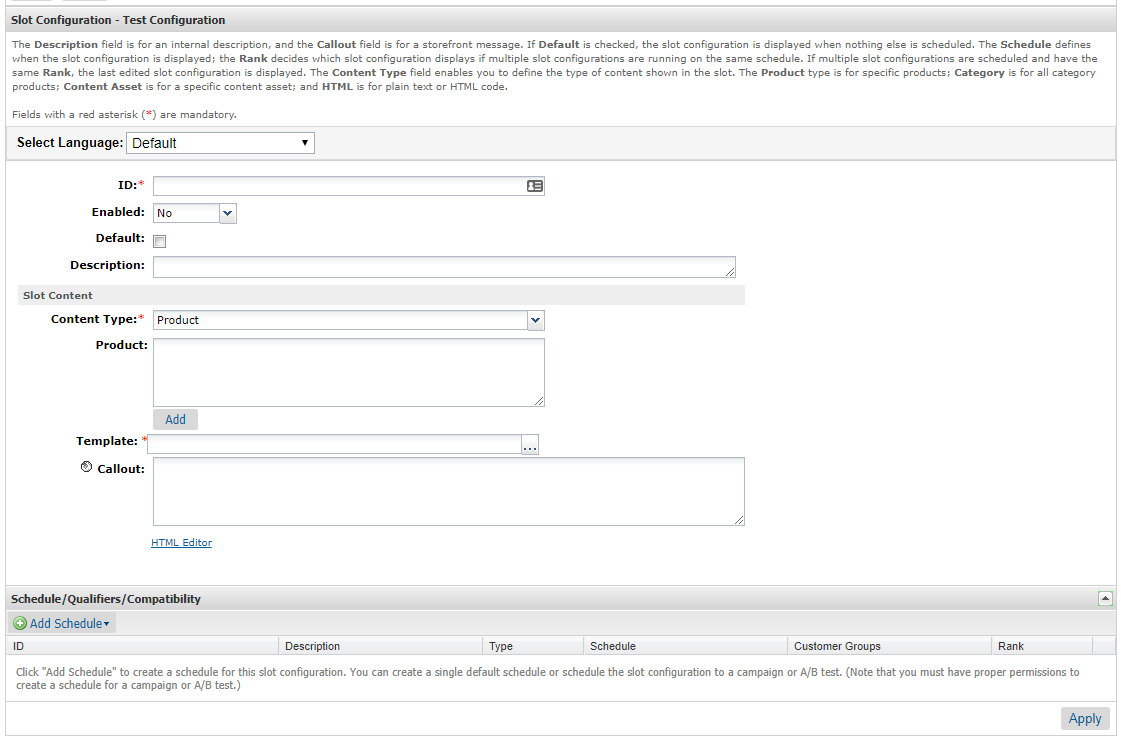
Some important fields include Content Type, the textarea below Content Type, Template, and Callout.
The Template field lets you select which code display template (ISML template) the website should run to display the content slot. The Callout field allows you to pass a textarea to the template. The Content Type allows you pass more specific data to the display template. Under Content Type we can select Product, Category, Content Asset, HTML or Recommendation. Each has a specific use.
Selecting Product reveals a Product textarea where you can type a list of product IDs. Alternatively, you can click the Add button underneath the field and select the products from your catalog. The display template automatically has access to the product objects matching those IDs. This lets your display template access various information including those products’ names, prices, images, etc. This is useful for scenarios where you want to feature specific products in your content slot.
Selecting Category reveals a Category textarea where, just like with products, you can type a list of category IDs or select some using the Add button. Those categories and their attributes are then available to the display template.
Selecting Content Asset allows you to select one or more content assets from within Business Manager, each of which has its own WYSIWYG content. This is helpful for combining multiple content assets and showing them in a single slot.
Selecting HTML provides an HTML editor where you can paste in your own HTML to be passed to the display template. In this case you usually want your display template to print the passed-in HTML directly to the content slot output. The HTML editor has an image uploader which allows you to browse and upload site assets.
Lastly, selecting Recommendation lets you utilize previously-defined business rules about how Commerce Cloud Einstein provides product recommendations. You would use this to show products specifically recommended for the current site visitor.
Building the Front End
Now that we have a basic understanding of content slot configurations, let’s create some sample content to put into a content slot. Let’s say we design content that has a headline, a background image, three product thumbnails with titles, and a CTA that triggers some JavaScript action when clicked. Developing on our local machine, we might come up with something like this:
<style>
	.voltage-banner {
		background: url("my-background.jpg") center center;
		background-size: cover;
		width: 100%;
		display: block;
		padding: 12px 0;
		text-align: center;
		color: #fff;
	}
	.voltage-product-card {
		width: 33%;
		display: inline-block;
		text-align: center;
	}
</style>

<div class="voltage-banner">
    <h2>Spring Line</h2>
    <p><button id="promo-button">Get special offer</button></p>

    <div class="voltage-product-card">
        <a title="Product 1" href="LinkToProduct1"><img src="product1.jpg" alt="Product 1" /></a>
        <h3><a title="Product 1" href="LinkToProduct1">Product 1</a></h3>
    </div>
    <div class="voltage-product-card">
        <a title="Product 2" href="LinkToProduct2"><img src="product2.jpg" alt="Product 2" /></a>
        <h3><a title="Product 2" href="LinkToProduct2">Product 2</a></h3>
    </div>
    <div class="voltage-product-card">
        <a title="Product 3" href="LinkToProduct3"><img src="product3.jpg" alt="Product 3" /></a>
        <h3><a title="Product 3" href="LinkToProduct3">Product 3</a></h3>
    </div>
</div>

<script type="text/javascript">
	var button = document.getElementById("promo-button");
	button.onclick = function() {
		alert('Trigger promo action');
	}
</script>
In this code we have some CSS, HTML and JavaScript. Let’s take a look into how we can deliver this through Commerce Cloud Digital using content slots.
Delivery 1: HTML Content Slot
The quickest way to get this HTML working in Commerce Cloud Digital is to find an existing content slot on your site and paste in the code as an HTML Content Type. For this example, we’ll update the homepage banner area of the SiteGenesis theme. Navigate to Merchant Tools > Online Marketing > Content Slots to see all the content slots that are currently available. Pick home-main and add a new Slot Configuration. Enable this configuration and make it the default. Select HTML as the Content Type and paste in everything we wrote above.
Commerce Cloud Digital needs to know about your images, which in our example includes the background image and three product images. Click on HTML Editor to upload a background image and get its path. I uploaded my image my-background.jpg to images/slot/voltage/banner/ so the path is images/slot/voltage/banner/my-background.jpg?$staticlink$. Commerce Cloud Digital will know how to resolve this path. We now update the HTML textarea so that we use that image path for the background.
.voltage-banner {
    background: url(images/slot/voltage/banner/my-background.jpg?$staticlink$) center center;
   // ...
}
As a side note, we can upload other file types besides images. You can even upload CSS and JavaScript files!
Now we need to select a slot template ISML file. There is a default HTML slot container in SiteGenesis that we can use at slots/html/htmlslotcontainer.isml. Click Add Schedule and Apply to save our work. Most Commerce Cloud Digital sites have an HTML slot template similar to htmlslotcontainer.isml that simply outputs the HTML to the webpage. This is what the template looks like:
<iscontent type="text/html" charset="UTF-8" compact="true"/>
<iscache type="relative" hour="24"/>

<div class="html-slot-container">
    <isif condition="${slotcontent != null}">
        <isloop items="${slotcontent.content}" var="markupText">
            <isprint value="${markupText.markup}" encoding="off"/>
        </isloop>
    </isif>
</div>
Navigating to the homepage we see something like this:
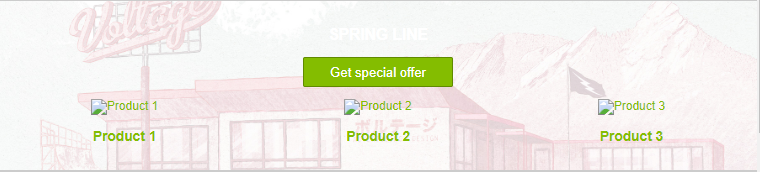
The background image pulled in, but the three product image paths and product links still haven’t been filled in. The CSS and JavaScript work though. If you click on the Get special offer button, the test alert box opens.
We could certainly find images, titles and URLs for the three products and manually enter them into our HTML content slot, but there is a better way to get that data.
Delivery 2: Product Content Slot
We can get the product data by using a Product content slot instead of HTML. When we change the Content Type to Product a Product textarea replaces the HTML textarea. We can select several products using the Add button which adds the product IDs to the textarea. Those product objects will be available to the display template. Go ahead and add at least three product IDs to the Product textarea.
Let’s create our own display template in the website codebase. We look in our cartridge and add a new file at cartridge > templates > default > slots > product > voltage-banner.isml. Our file can look like this:
<iscontent type="text/html" charset="UTF-8" compact="true"/>
<iscache type="relative" minute="60" />

<isif condition="${slotcontent != null}">
    <style>
        .voltage-banner {
            background: url("images/slot/voltage/banner/my-background.jpg?$staticlink$") center center;
            background-size: cover;
            width: 100%;
            display: block;
            padding: 12px 0;
            text-align: center;
        }
        .voltage-product-card {
            width: 33%;
            display: inline-block;
            text-align: center;
        }
    </style>

    <div class="voltage-banner">
        <h2>Spring Line</h2>
        <p><button id="promo-button">Get special offer</button></p>

        <iscomment>Display the products</iscomment>
        <isloop items="${slotcontent.content}" var="product" begin="0" end="2">
            <isset name="Product" value="${product}" scope="pdict" />
            <isif condition="${!empty(pdict.Product)}">

                <div class="voltage-product-card">
                    <isif condition="${!empty(pdict.Product.getImage('medium',0))}">
                        <a title="${product.name}"  href="${URLUtils.http('Product-Show','pid', product.ID)}"><img src="${product.getImage('medium',0).getURL()}" alt="${product.name}" /></a>
                    </isif>
                    <h3><a title="${product.name}"  href="${URLUtils.http('Product-Show','pid', product.ID)}"><isprint value="${product.name}"/></a></h3>
                </div>

            </isif>
        </isloop>

    </div>

    <script type="text/javascript">
        var button = document.getElementById("promo-button");
        button.onclick = function() {
            alert('Trigger promo action');
        }
    </script>

</isif>
Here is the result:
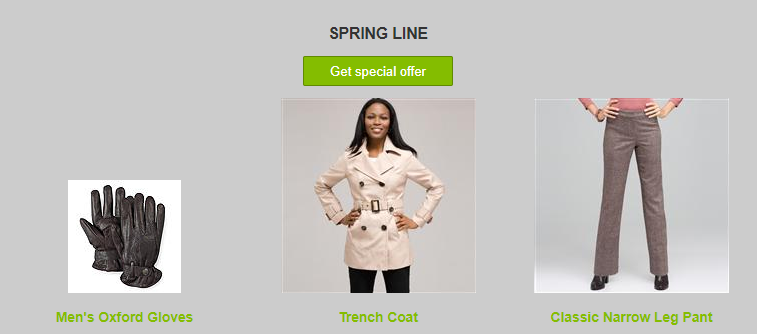
This is a step forward because we are now able to loop through the products passed in as the slot content and get dynamic images, titles and URLs. Although the JavaScript still works, we’ve lost our CSS background image. Inspecting the HTML page source we see that the browser is rendering this CSS:
.voltage-banner {
    background: url("images/slot/voltage/banner/my-background.jpg?$staticlink$") center center;
   // ...
}
Inside the ISML template, the ?$staticlink$ didn’t resolve to a full path. We could hard-code an image path in the ISML file, or we could upload an image to the codebase’s static asset folder and reference it using URLUtils. Neither of those sound like a good option though because merchants might need to change the image frequently.
Delivery 3: Product Content Slot and Variables
It would be great if we could leverage Business Manager for all content and still use the codebase for templating. We don’t want to store images in the website codebase; those really belong with the content. We also don’t want to hard-code product data into an HTML slot; products should be selected by the merchant and then load from the back end. Our solution is to pass all content data from the front end to the back end while putting all the code in the back end.
Luckily we still have the Callout field with access to the HTML Editor. Let’s use the Callout to pass the content we want to use to the backend template. We already uploaded the background image to the Image Browser. Let’s paste the following into our Callout textarea:
{
"headline": "Spring Line",
"backgroundImage": "images/slot/voltage/banner/my-background.jpg?$staticlink$",
"promoText": "Get special offer"
}
We’ve extracted the content data specific to this content slot configuration and put it into JSON format! Now we can update our ISML template to read the JSON and use it:
<iscontent type="text/html" charset="UTF-8" compact="true"/>
<iscache type="relative" minute="60" />

<isif condition="${slotcontent != null}">

    <iscomment>Extract data</iscomment>
    <isscript>
        temp1 = slotcontent.calloutMsg + ""; // Cast as a string
        temp2 = temp1.replace(/(\r\n\t|\n|\r\t)/gm,""); // Remove return lines
        data = JSON.parse(temp2); // Parse into object
    </isscript>

    <style>
        .voltage-banner {
            background: url("${data.backgroundImage}") center center;
            background-size: cover;
            width: 100%;
            display: block;
            padding: 12px 0;
            text-align: center;
        }
        .voltage-product-card {
            width: 33%;
            display: inline-block;
            text-align: center;
        }
    </style>

    <div class="voltage-banner">
        <h2>${data.headline}</h2>
        <p><button id="promo-button">${data.promoText}</button></p>

        <iscomment>Display the products</iscomment>
        <isloop items="${slotcontent.content}" var="product" begin="0" end="2">
            <isset name="Product" value="${product}" scope="pdict" />
            <iscomment>Check for a product in the dictionary, if no product found. This section is skipped.</iscomment>
            <isif condition="${!empty(pdict.Product)}">

                <div class="voltage-product-card">
                    <isif condition="${!empty(pdict.Product.getImage('medium',0))}">
                        <a title="${product.name}"  href="${URLUtils.http('Product-Show','pid', product.ID)}"><img src="${product.getImage('medium',0).getURL()}" alt="${product.name}" /></a>
                    </isif>
                    <h3><a title="${product.name}"  href="${URLUtils.http('Product-Show','pid', product.ID)}"><isprint value="${product.name}"/></a></h3>
                    <isinclude template="product/components/pricing"/>
                </div>

            </isif>
        </isloop>

    </div>

    <script type="text/javascript">
        var button = document.getElementById("promo-button");
        button.onclick = function() {
            alert('Trigger promo action');
        }
    </script>

</isif>
And here is our updated homepage:
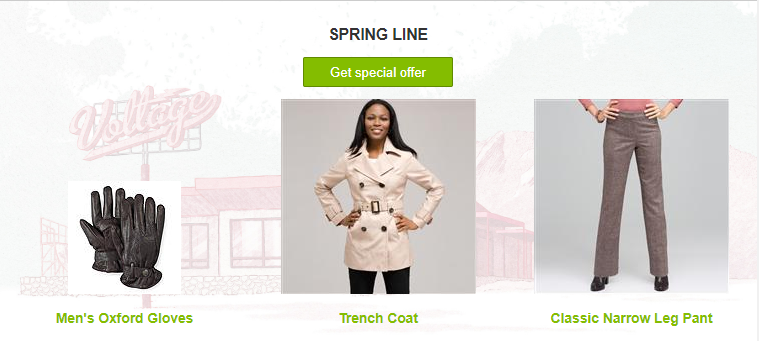
Much better! Notice how we can inject the data, for example in the headline: <h2>${data.headline}</h2> which pulls from the JSON in the Callout. Now the merchant can change the data in the Callout at any time without having to worry about messing up the HTML formatting (though they will have to be careful not to enter invalid JSON). I like to put a JSON example in the slot configuration Description textarea. That way the merchant can always copy/paste a fresh copy of the JSON keys and dummy values into the Callout if they accidentally break the formatting.
Also note that since the data was passed from Business Manager, the path to the background image was automatically resolved.
As an aside, we can pass data into the Callout field in whichever format we want; I tend to prefer JSON. We could even pass HTML into Callout and output it back in the ISML template.
Going Beyond Content Slots
All the content from a content slot is always output together in the same place. This means that if your content slot is coded to be in the document <body>, everything (HTML/CSS/JS) from the content slot will be in the body. If the content slot is coded to be in the document head, everything will be in the <head> (which is not a good place for HTML)!
What if your content specifically requires the CSS or JavaScript to load when or before the DOM is ready? In that case we would need for CSS and/or JavaScript to be included in the document <head> and your HTML to be loaded in the document <body>. This will guarantee that the CSS is ready by the time the HTML is rendered, preventing glitches as the page loads. This also allows JavaScript to do DOM manipulation and other tasks before anything is displayed to the user.
One solution is to use two content slots for your marketing content, one that appears in the document head and one that appears in the document body. The merchant would have to be clever enough to schedule only the needed CSS/JS in the <head> slot and only HTML in the <body> slot with an identical schedule. This takes careful coordination, requires updates in two places in Business Manager, and is prone to errors.
If you need this kind of control, a content slot may not the best place for your content. You could alter your website code to always include the CSS and JavaScript needed for your content slot in the <head>, and then if your content slot ISML is rendered the CSS/JS are ready to go. Unfortunately you would end up always loading that CSS/JS on every page, even when the content slot is not used.
The content slot acts like its own sandbox. There is no way for the website code to conditionally load that CSS/JS depending on whether or not a given content slot is used. There is also no way to pass data from the content slot template into the parent template that called it.
In this situation, I recommend using <isinclude>. When including a content slot, we may have used code like this to include it:
<isslot id="home-banner" description="Banner on homepage" context="global" />
When switching to <isinclude> we would change the code to something like this:
<isinclude template="components/voltage/banner" />
In components/voltage/banner.isml we can start with the same code that is in voltage-banner.isml. Then we can move all the CSS into a CSS file and the JavaScript into a JS file, and put both in the static assets folder at voltage/css/banner.css and voltage/js/banner.js. We will have to hard-code the values of all our variables because we are no longer using a content slot which means that data will not be passed from Business Manager to the template. We will also have to add code to load the three product objects we want to use.
Now we update banner.isml to include script like this:
<isscript>
    if (request.custom.voltageHeadData == null) {
        request.custom.voltageHeadData = {"css":[],"js":[]};
    }

    request.custom.voltageHeadData.css.push(URLUtils.staticURL('/voltage/css/banner.css'));
    request.custom.voltageHeadData.js.push(URLUtils.staticURL('/voltage/js/banner.js'));
</isscript>
This code adds paths to the CSS and JavaScript files to the request object as custom data. At this point, components/voltage/banner.isml only has HTML in it. The last thing we need to do is to get those CSS and JS files into the document <head>, but only when this <isinclude> is used. Find the ISML template that generates the document <head> and add:
<isif condition="${request.custom.voltageHeadData}">
    <isloop items="${request.custom.voltageHeadData.css}" var="css">
        <link rel="stylesheet" type="text/css" href="${css}">
    </isloop>
    <isloop items="${request.custom.voltageHeadData.js}" var="js">
        <script type="text/javascript" src="${js}"></script>
    </isloop>
</isif>
This is neat because we can include as many <isinclude> templates as we want in the final webpage with as many CSS/JS files as we want. Those CSS/JS files will all be added to the request object which will be accessed by your main ISML template and outputted as CSS and JS includes. The CSS and JS files now load in the <head> before the DOM is ready. All CSS/JS files needed for a <isinclude> template are defined in that same template neatly organized alongside the HTML.
Unfortunately, this method loses our ability to interact with this content via content slots and Business Manager. We now have to add, maintain and remove this content entirely in the codebase. All content is hard-coded.
Wrap Up
In this article, we learned how to effectively use content slots without making any site code changes. Next we moved our content into a code ISML template. Then we passed variables from the content slot to the ISML template for better merchant control over the content. Lastly, we explored include templates that allow us complete control over the CSS/JS but forfeit our ability to manage the content from Business Manager.
What is your favorite way to manage content in Commerce Cloud Digital?