

7 fashion and apparel brands that nail brand voice
A VOLTAGE round-up of brands who give customers great copy.
-

- Julie Overby Jun 11

See how Laravel’s cache drivers perform. Conserve server memory without significantly slowing response times. Learn how the decorator pattern makes caching manageable.
Whenever you find your web application making the same database queries or same calculations over and over, you might consider storing the result of that query or calculation in an object cache. This will reduce load on both the database and the server.
In this article we will set up an example application and run two experiments caching both full results and chunked results. We will explore the cache drivers provided by Laravel, including configuration and performance. We’ll demonstrate the decorator design pattern for decoupling caching from your application logic. Lastly, we’ll show how the decorator pattern can facilitate cache warming.
Object caching utilizes key-pair storage. You tell the cache backend which key to use and what data to store at that key. To retrieve an item, you send your key to the cache backend and it returns the value you stored there.
Cache drivers simply connect your application to an underlying cache backend via contracts. Laravel provides a handful of excellent cache drivers out of the box including apc, array, database, file, memcached and redis. In a later section we will look at the use case and configuration for each driver in greater depth.
In Laravel, cache drivers implement the Illuminate\Contracts\Cache\Store contract.
<?php

namespace Illuminate\Contracts\Cache;

interface Store
{
    public function get($key);
    public function many(array $keys);
    public function put($key, $value, $minutes);
    public function putMany(array $values, $minutes);
    public function increment($key, $value = 1);
    public function decrement($key, $value = 1);
    public function forever($key, $value);
    public function forget($key);
    public function flush();
    public function getPrefix();
}
If you don’t want to use one of Laravel’s cache drivers, you may create your own by implementing the Store interface.
With a cache driver defined, Laravel creates a cache repository that implements the Illuminate\Contracts\Cache\Repository contract using that driver.
<?php

namespace Illuminate\Contracts\Cache;

use Closure;
use Psr\SimpleCache\CacheInterface;

interface Repository extends CacheInterface
{
    public function has($key);
    public function get($key, $default = null);
    public function pull($key, $default = null);
    public function put($key, $value, $minutes);
    public function add($key, $value, $minutes);
    public function increment($key, $value = 1);
    public function decrement($key, $value = 1);
    public function forever($key, $value);
    public function remember($key, $minutes, Closure $callback);
    public function sear($key, Closure $callback);
    public function rememberForever($key, Closure $callback);
    public function forget($key);
    public function getStore();
}
This allows us to use the Cache facade throughout our code such as Cache::has('key'), Cache::get('key'), Cache::put('key', 'value', $minutes) and Cache::forget('key').
One of the most convenient cache commands Laravel provides is Cache::remember which retrieves and stores data. If the requested data is already in the cache, it is returned from the cache. Otherwise the data is generated, stored in the cache and returned. Its usage looks something like this:
$value = Cache::remember('users', $minutes, function () {
    return DB::table('users')->get();
});
In this example, data is returned from the cache for the key users. If that data isn’t already in the cache, user data is obtained from the database, stored in the cache and returned.
In our experiments we’ll look at a sample application that loads data for a graph via AJAX. The data will require both database queries and computations by the application. This will allow us to see the effect of different caching approaches.
Debugbar will help us understand the AJAX request by showing the time spent making database queries, the total time for the request and the memory used servicing the request. Once the data is returned, our sample application will look similar to this:
If you would like to follow along, feel free to clone my public git repository here. Otherwise, skip ahead to Experiment 1. The code runs nicely on Laravel Homestead.
In order to see the effect of caching, we need plenty of database queries and computations. Let’s build a report for an online store that shows how much revenue each product has generated over a period of time.
The code has three models in app/: Customer.php, Order.php and Lineitem.php. Each customer has an order, and each order has a number of line items in that order. In app/database/migrations you’ll find a migration for each model. Factories for each model are in app/database/factories. There is a database seeder at app/database/seeds/OrderSeeder.php. The seeder creates 10,000 customers, each with an order, and creates a number of line items for each order. Run composer install, php artisan migrate and php artisan db:seed on the application code to fill your database with around 4 MB of data.
There is a route in routes/web.php for the report page which renders resources/views/results.blade.php. The front end JavaScript in the view calls a second route, found in routes/api.php, to load the graph data. Once returned, the page renders a graph using Chart.js.
If you followed along, and if you set up a virtual host, at caching.test for example, you should be able to navigate to http://caching.test/2018-05-15/2018-06-05 (replace 2018-05-15 with the date three weeks ago and replace 2018-06-05 with tomorrow’s date) and see the graph.
In this experiment we will establish a performance baseline and then cache the entire result to measure the improvement.
If you are following along, checkout the branch called experiment-cache-full and update the cache driver in your .env file to say CACHE_DRIVER=array. The array driver tells Laravel to not use any cache at all.
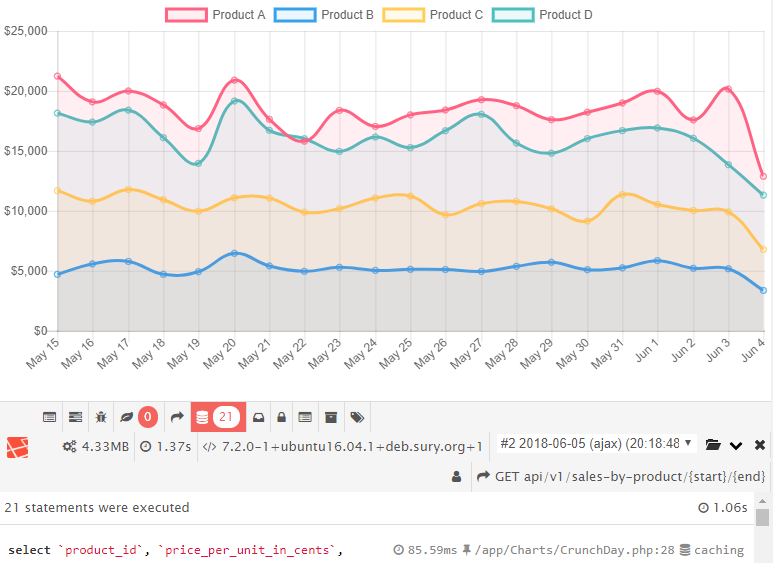
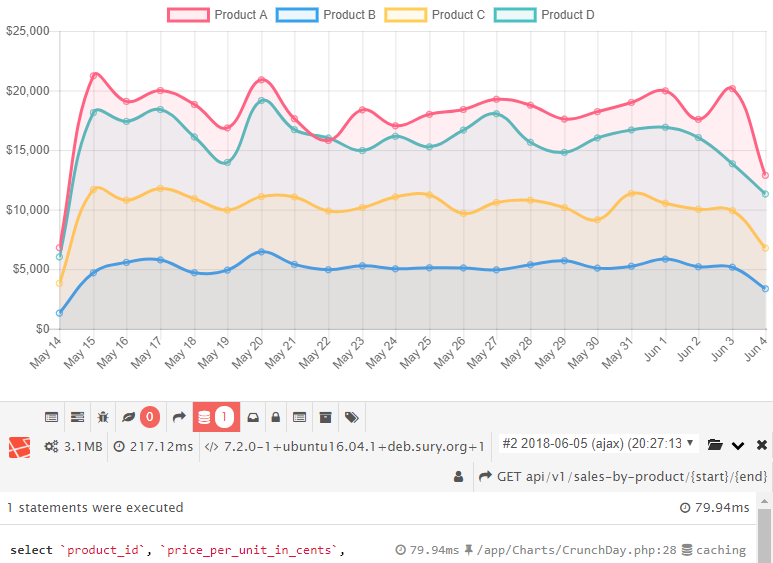
Let’s take a look at what we get when we load http://caching.test/2018-05-29/2018-06-05
Thanks to debugbar we see that this graph takes 288ms, 105ms of which are spent doing a single database query. The application server uses 7MB to generate the response.
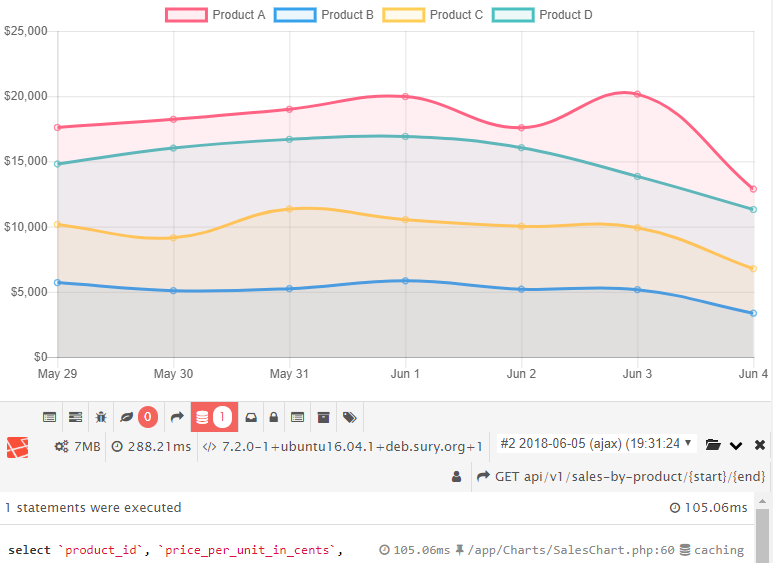
Let’s increase to two weeks using http://caching.test/2018-05-22/2018-06-05
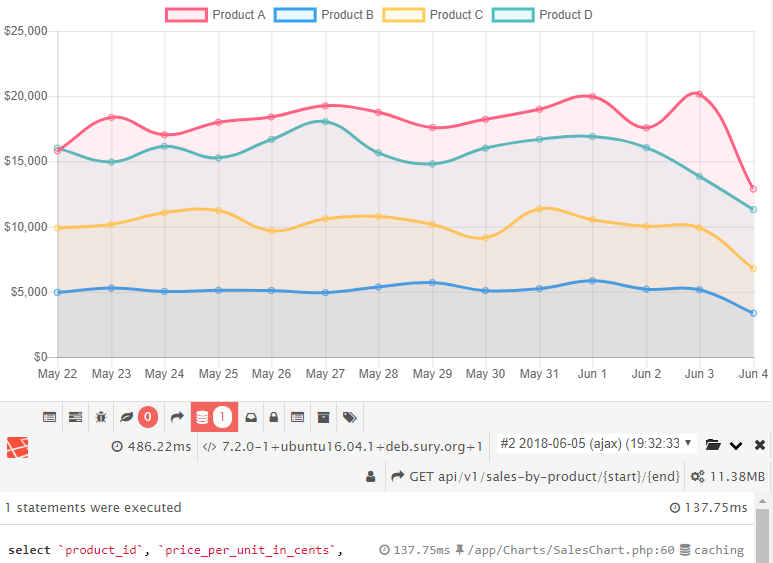
and three weeks by calling http://caching.test/2018-05-15/2018-06-05
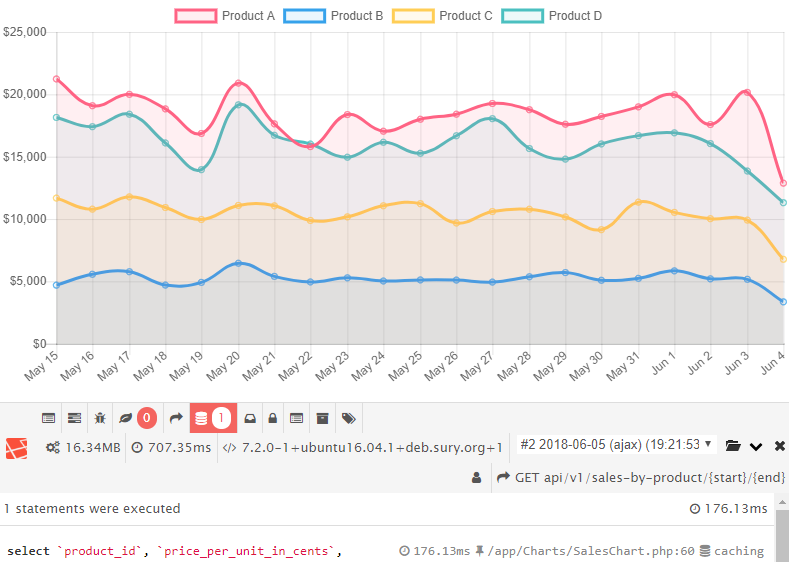
Take a look at how the response time grows as we include more days of data.
| Days | DB time | Total time | Memory |
|---|---|---|---|
| 7 | 105ms | 288ms | 7MB |
| 14 | 137ms | 486ms | 11MB |
| 21 | 176ms | 707ms | 16MB |
We see that every week we add to the graph increases both the response time and memory used. Imagine if we needed to plot 50 or 100 weeks. The page might easily take several seconds, assuming the server thread doesn’t run out of memory first.
Let’s first add caching and then address our scalability problem. Notice that in ApiController.php we have the following code:
// Cache data for full interval
$cacheKey = md5('full' . $start . $end);
$minutes = 60;
$data = Cache::remember($cacheKey, $minutes, function() use ($chart, $start, $end) {
    return $chart->getChartData($start, $end);
});
This code is the same as simply calling $data = $chart->getChartData($start, $end); except that the results are pulled from the cache, or added to the cache if they are not already in the cache.
The cache key can be any value. I create an md5 hash that includes the range being cached, and I cache the result for 60 minutes.
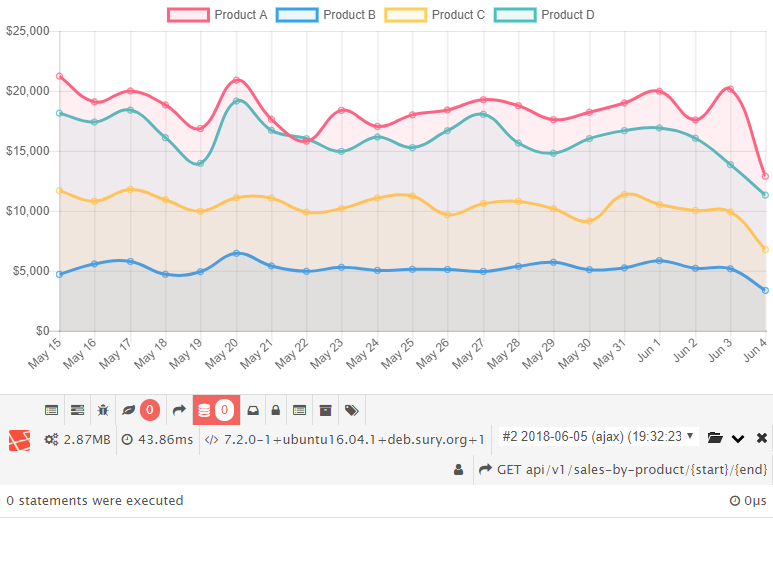
Let’s see the cache in action. Do this by changing your .env file to say CACHE_DRIVER=file. Laravel will now use the server’s file system to cache data. Now refresh http://caching.test/2018-05-15/2018-06-05. The response time and memory usage should be about the same. This is because we had a cache miss. Refresh the page a second time and you will have a cache hit.
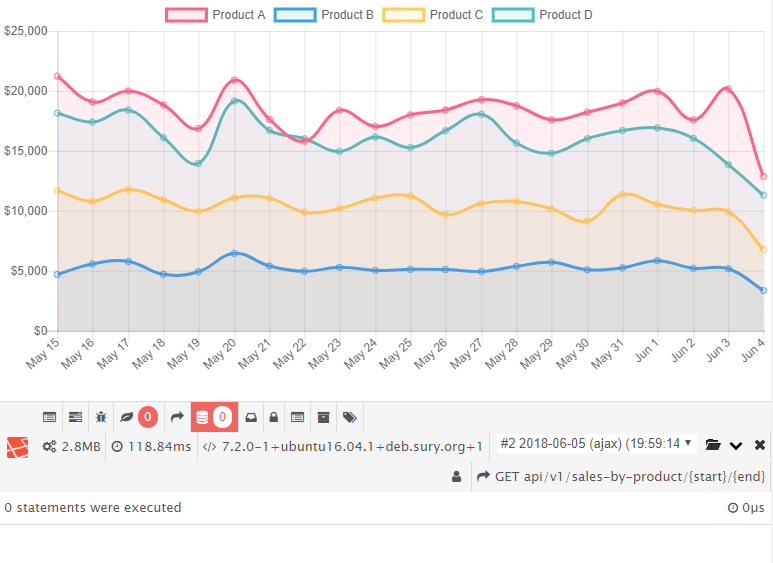
The request time is down to 118ms while using only 2.8MB of memory. This is because we didn’t have to run any queries to get the data; the data was loaded straight from the cache files.
Although the page speed and memory are lower, the application was still slow and used a lot of memory on the first cache miss. Also, notice what happens if we change the range by one day by navigating to http://caching.test/2018-05-14/2018-06-05 (note that I changed May 15 to May 14).
We’re back to a slow and memory-intensive cache miss.
Let’s see what we can do about the speed and memory problems from the previous experiment. One change we can try is to chunk our data results instead of getting them all in one big query.
If you’re following along, checkout the branch called experiment-cache-chunked, and make sure your .env file says CACHE_DRIVER=file.
Notice that the ApiController says $data = $chart->getChartData($start, $end); and no longer has any references to caching. Caching is now moved to the app/Charts/SalesChart.php class. We see a function like this:
// Gets data for all days within range
public function getChartData($start, $end) {

    $currentDay = new Carbon($start);
    $lastDay = new Carbon($end);
    $allDaysData = null;
    $day = new CrunchDay;

    // Get data for one day at a time
    while ($currentDay->lessThan($lastDay)) {

        // Get and cache data for the day
        $cacheKey = md5('day-data' . $currentDay->format('Ymd'));
        $minutes = 60;
        $dayData = Cache::remember($cacheKey, $minutes, function() use ($currentDay, $day) {
            return $day->crunchData($currentDay, $this->labels);
        });

        // Add results to running tally
        $allDaysData = $this->addDayToResults($dayData, $allDaysData);

        // Increment day
        $currentDay->addDay();
    }

    return $allDaysData;
}
There is now a CrunchDay class that is doing data queries and crunching one day at a time. The results of each day are cached.
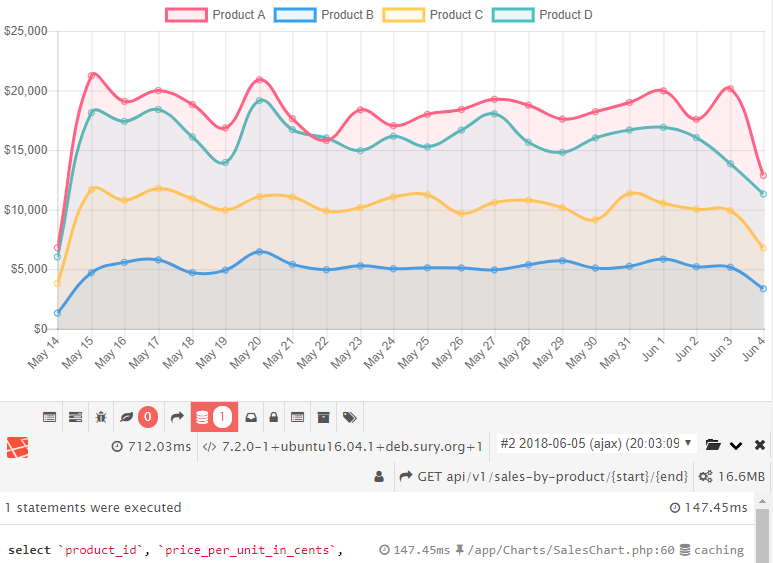
Let’s reset a few things from the previous experiment. Go back to http://caching.test/2018-05-15/2018-06-05 in your browser and you’ll probably see that the result is still cached from our first experiment. From the command line you may clear your object cache by running php artisan cache:clear. Now refresh http://caching.test/2018-05-15/2018-06-05. The first time should be a slow cache miss.

Notice that this cache miss takes more time than cache misses in Experiment 1. See in debugbar that 21 queries took place, one for each day. Refresh a second time; you should get a fast cache hit.
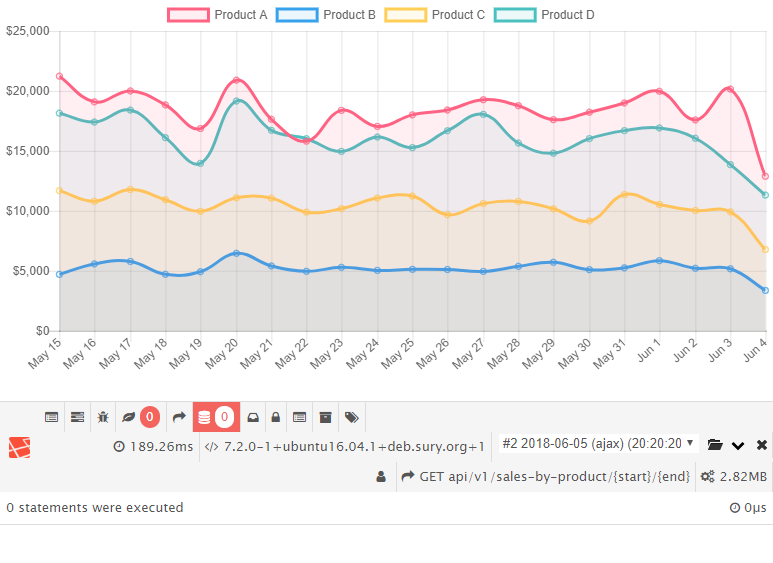
At 189ms, this cache hit isn’t as fast as from our previous experiment either (118ms). This is because we are only caching the daily results. The application still has to aggregate all the results from the 21 cached days into the final result.
What are the benefits of this approach? Notice that the cache miss from Experiment 2 only took 4MB instead of 16MB from Experiment 1. We ended up sacrificing a little speed for a lot of memory savings. This is important because our memory usage is near constant. We could go up to 50 or 100 weeks of data while still using only a few MB.
Another benefit of caching in chunks is that we can change the date range and take advantage of the days that are already cached. In other words, navigate to http://caching.test/2018-05-14/2018-06-05 (note that one day has been added to include 22 days) and take a look at the result.
In Experiment 1, this page took 712ms and 16MB of memory on a cache miss. Now it only took 217ms and 3MB of memory! That’s because of the 22 days in the graph, 21 were already cached, so the application only had to look up and crunch data for the one missing day.
We can further improve our cache results by switching drivers to an in-memory cache backend. Laravel ships with drivers for array, apc, file, database, memcached and redis. The array driver tells Laravel to not use any cache backend. The apc driver uses the Alternative PHP Cache which can be effective but is not scalable past a single server.
Let’s see how to set up and when to use each of the remaining cache backends.
Edit your .env file and set CACHE_DRIVER=file. That’s it. No, really. You’ve been using the file cache this whole time. Files are stored in the app/storage/framework/cache directory for object caching. Disk I/O is not the fastest and cannot easily be shared with other servers. Use the file cache when you need to quickly deploy caching on a single server and don’t have any extra RAM available.
Edit your .env file and set CACHE_DRIVER=database. On the command line run php artisan cache:table followed by php artisan migrate. This creates and migrates a table to be used to store cache key-value pairs. Using the database as a cache is an easy way to get a shared multi-server cache running and is faster than using the filesystem. However, if you’re doing heavy caching, you probably don’t want to use your database because now your existing application database queries must share access with cache calls. If you need to read 100 objects from your cache, you’ll have to make 100 database reads.
Edit your .env file and set CACHE_DRIVER=memcached. If you are using Laravel Homestead, you’re done. Otherwise, be sure in install the Memcached PECL package. Set environment variables for the Memcached variables in config/cache.php. Memcached is an in-memory cache that is very fast and ideal for caching small data objects.
Edit your .env file and set CACHE_DRIVER=redis. Then run composer require predis/predis on the command line to add the PHP predis package. If you are not using Homestead you’ll need to configure your host, password, port and any clusters. Redis is a data structure server that stores objects in memory and can scale horizontally using clusters.
Unless you are caching an exorbitant amount of data, use an in-memory cache backend like Memcached or Redis rather than a database or file backend. Both can share access to multiple servers and are very fast.
Let’s see how each driver performs on our application. We’ll do this using Apache Bench to hit our web page 10 times list so:
$ ab -n 10 http://caching.test/api/v1/sales-by-product/2018-05-15/2018-06-05
For each driver, clear the cache first. The subsequent visit to our API endpoint will result in a cache miss. Regardless of the cache backend, all cache misses will take roughly the same amount of time. Warm the cache with one hit before running Apache Bench.
Starting with the file cache, we get these results:
Clearing the cache and running the same test on each driver produces the following results:
| Mean | Median | |
|---|---|---|
| No Cache | 1170ms | 1169ms |
| File | 99ms | 94ms |
| Database | 141ms | 138ms |
| Memcached | 63ms | 52ms |
| Redis | 57ms | 53ms |
We see that Memcached and Redis perform almost the same in our experiment because they are both in-memory cache backends and the objects we are caching are small. There is no shortage of opinions as to which is better in a given scenario.
For the rest of this post, we’ll use Redis. Using Redis caching on our three week graph, we now get excellent request times.
Up to this point our code has worked but does not follow any good design patterns. It would be beneficial to decouple our query/calculation code from our caching code. We can do this using the decorator pattern. From Wikipedia:
“…the decorator pattern is a design pattern that allows behavior to be added to an individual object, either statically or dynamically, without affecting the behavior of other objects from the same class.”
In other words, if we have class A, we should be able to wrapper class A inside a class B in order to add new functionality to class A without class A being aware of class B. In the context of our experiments, let’s say that class A prepares the graph data without implementing any caching. We could write class B as a wrapper around class A, and class B could add caching around class A, much like middleware. Let’s take a look.
If you are following along with the repo, checkout the master branch and take a look at app/Charts/SalesChart.php. We used to have the following cache code:
// Get and cache data for the day
$cacheKey = md5('day-data' . $currentDay->format('Ymd'));
$minutes = 60;
$dayData = Cache::remember($cacheKey, $minutes, function() use ($currentDay, $day) {
    return $day->crunchData($currentDay, $this->labels);
});
The cache code is gone and only the following remains:
$dayData = $day->crunchData($currentDay, $this->labels);Now SalesChart.php has no caching code, just like it did in the beginning.
Next open app/Charts/CrunchDay.php. The only difference in this file is that class CrunchDay implements DataCruncherInterface. We’ve given the class a contract called DataCruncherInterface.
We next create the contract. This can be seen in app/Charts/Interfaces/DataCruncherInterface.php which looks like:
<?php

namespace App\Charts\Interfaces;

interface DataCruncherInterface {

    public function crunchData($dayStart, $labels);

}
Everything still works the same as it did before. We’ve simply stated that CrunchDay.php will adhere to the DataCruncherInterface contract.
This is where things get really interesting and we see the decorator pattern in action. Look inside the new class at app/Charts/Cache/DayCache.php.
<?php

namespace App\Charts\Cache;

use App\Charts\Interfaces\DataCruncherInterface;

use Cache;

class DayCache implements DataCruncherInterface {

    private $next;

    public function __construct(DataCruncherInterface $next) {
        $this->next = $next;
    }

    public function crunchData($dayStart, $labels) {

        // Get and cache data for the day
        $cacheKey = md5($dayStart->format('Ymd') . http_build_query($labels));
        $minutes = 60;
        return Cache::remember($cacheKey, $minutes, function() use ($dayStart, $labels) {
            return $this->next->crunchData($dayStart, $labels);
        });
    }

}
The constructor expects an object that implements DataCruncherInterface. DayCache then provides the same crunchData class, but instead of returning the results of the object implementing DataCruncherInterface, it caches the results and then returns them. That’s it! We can now use a DayCache object anywhere we would have previously used a CrunchDay object. CrunchDay still prepares the data and DayCache caches that data.
You may notice that in the code repository, the same pattern has been applied to SalesChart using a new class ChartCache which will cache the data after each day’s data is combined into a final result.
Since our logic is decoupled and we are using contracts, we can take advantage of Laravel’s Service Container to inject cache instances wherever we need data instances.
To do this, create and register a new service provider (see app/Providers/ChartsServiceProvider.php). In the register function we see:
$this->app->singleton(ChartInterface::class, function($app) {
    return new ChartCache(new SalesChart);
});

$this->app->singleton(DataCruncherInterface::class, function($app) {
    return new DayCache(new CrunchDay);
});
This means that whenever Laravel sees a type-hinted ChartInterface, it will pass in a ChartCache singleton, which is a wrapper for the SalesChart object. Anytime a DataCruncherInterface class needs to be resolved, Laravel will inject a DayCache singleton.
With this in place, we can update our ApiController.php to inject type-hinted objects into our function.
public function productSales(ChartInterface $chart, DataCruncherInterface $day, GraphFormatter $graph, $start, $end) {

    // Crunch the numbers
    $data = $chart->getChartData($day, $start, $end);
    $labels = $chart->getChartLabels();

    // Convert data info ChartJS format
    return $graph->generateGraph($data, $labels);
}
Our code is now caching on two levels: once per day for daily numbers and once for the entire graph data. Refreshing the browser twice we get an even faster response at just 36ms.

The decorator pattern gives us several benefits:
How would we leverage the service provider to use or not use our cache? Let’s say we want to cache our daily data but not our final, combined data. In app/Providers/ChartsServiceProvider.php we can replace return new ChartCache(new SalesChart); with return new SalesChart;. Now Laravel will resolve type-hinted ChartInterface to SalesChart which doesn’t have any caching.
There is one more benefit of using the decorator pattern: Decoupled code is more flexible. We can use our caching capabilities in other places without rewriting our classes. For example, let’s say that you don’t want users to have to wait over one second if the cache is cold. Sure, most users are getting responses of 50ms, but what about the first user that had to warm the cache for everyone else?
In the master branch is a new file app/Console/Commands/WarmDailyProductSalesCache.php. This is an artisan command that loops through the past 30 days and caches each day.
public function handle(DataCruncherInterface $day)
{
    $this->info('Caching the past 30 days...');

    $lastDay = now();
    $currentDay = now()->subDays(30);
    $labels = [
        1 => 'Product A',
        2 => 'Product B',
        3 => 'Product C',
        4 => 'Product D',
    ];

    // Address each day
    while ($currentDay->lessThan($lastDay)) {

        // Cache data for this day
        $day->crunchData($currentDay, $labels);

        // Increment day
        $currentDay->addDay();
    }

    $this->info('Oh yeah, it’s cached');
}
See how simple it was to warm the cache? Clear your cache, run the command php artisan cache:warm-daily and then refresh your browser. You get a 50ms response on the first visit! You could schedule this command to run once an hour in the Laravel command kernel and no one would ever get a cache miss.
Be careful about stuffing too much data into your cache though. If using Redis, you can enter redis-cli on the command line followed by info to see how much memory you are using.
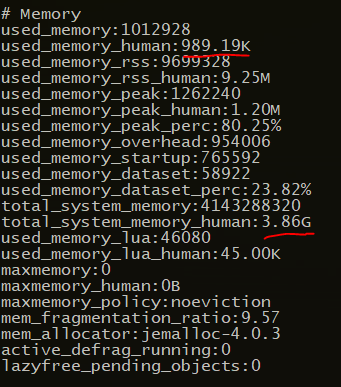
In my case, even after caching all 21 days and the combined result, I am using only 989 KB out of 3.86 GB which means I have plenty of space.
I hope this has been a helpful and practical primer on caching in Laravel. Setting up a shared in-memory cache server or cluster can drastically improve the performance of your application. Knowing when to cache and how big of objects to cache is an art and will depend on the behavior of your application and users. Therefore, if you have implemented the decorator pattern, your code will have the flexibility to quickly try a variety of cache experiments until you get it just right.
VOLTAGE is a creative agency specializing in giving your business a leg up in a performance driven world. Through brand design, creative strategy, and execution, we can drive results for your marketing.
Steven is the President and CTO at VOLTAGE. He is a technology enthusiast, a lifelong learner and a go-getter. He has a B.S. in Computer Engineering and a M.S. in Computer Science from Brigham Young University. He is an Eagle Scout and holds two patents. Steven believes in using creativity and technology to be a Force For Good.
View More Articles by StevenA VOLTAGE round-up of brands who give customers great copy.

Lookbooks captivate and convert customers, and it’s time you started using them.