Part 3: Creating a CRM
In the previous post we quickly created CMS features using Laravel Nova. Learning a few more of Nova’s features will allow us add customer relationship management (CRM) functionality as well.
Most large companies have a stand-alone CRM system. If you can afford a stand-alone CRM and have the discipline to use it, I highly recommend implementing one. I can hardly count the number of integrations I’ve built with Salesforce, Hubspot, and pipedrive (several of which have been integrated using Laravel or Lumen).
So why add CRM features to your Laravel web app using Nova?
- You don’t have a stand-alone CRM and don’t have the time or budget to implement one
- You don’t want to invest the time and resources to learn a new CRM
- You decide your web app’s data can be siloed
- You only need a few lightweight CRM features
- You want to control and trigger code functionality directly from your web app
In this post we’ll put together a lightweight CRM using Laravel Nova for a hypothetical chain car dealership. The dealership has multiple locations. Potential customers (leads) can enter a raffle giveaway at any dealer location. The web app administrator can make any lead a winner which sends them a congratulatory email. These are the Nova topics we’ll cover:
You may follow along every step by cloning my repo and checking out the part-2 branch, or you can checkout the part-3 branch to view the final code. If you use the code base, you will still need a Nova license to get it working.
Setup
We’ll set up by creating models, migrations, relationships, factories, seeds, and Nova Resources for locations and leads. If you have a good grasp on these topics from the previous post, feel free to skip down to filters.
Models
Let’s make models for Locations (dealerships) and for Leads (potential customers). On the command line type:
php artisan make:model Location
php artisan make:model Lead
Add a relationship between the two models. In app/Location.php add:
public function leads()
{
    return $this->hasMany('App\Lead');
}
and in app/Lead.php add:
public function location()
{
    return $this->belongsTo('App\Location');
}
Database
Next, create the underlying database tables.
php artisan make:migration create_locations_table --create=locations
php artisan make:migration create_leads_table --create=leads
Edit the migration for locations and add these table columns:
$table->increments('id');
$table->char('name');
$table->char('address_1');
$table->char('address_2')->nullable();
$table->char('city');
$table->char('state');
$table->char('postal_code');
$table->timestamps();
We give each location a name. We also set address_2 to nullable in case the user doesn’t enter a second line for address.
Now add these columns to the leads migration:
$table->increments('id');
$table->string('name');
$table->string('email');
$table->unsignedInteger('location_id');
$table->dateTime('is_winner')->nullable();
$table->timestamps();
Each lead will have a name, email, location, and a flag (is_winner) for whether they are a winner or not. We’ll use a nullable timestamp so we know if they won, and if so when they won.
Run the migrations:
php artisan migrate
Seeds
In real-world usage, we could assume that the site admin will add locations manually through Nova and that leads will submit their information through a web form. For the sake of this demo, rather than build that web form to populate leads and then manually submitting that form dozens of times to get lead data, let’s just create some using seeders.
We’ll start with factories for both models.
php artisan make:factory LocationFactory --model=Location
php artisan make:factory LeadFactory --model=Lead
Edit database/factories/LocationFactory.php to fill in some locations using Faker.
<?php

use Faker\Generator as Faker;

$factory->define(App\Location::class, function (Faker $faker) {
    $city = $faker->city;
    return [
        'name' => $city,
        'address_1' => $faker->streetName,
        'address_2' => $faker->secondaryAddress,
        'city' => $city,
        'state' => $faker->state,
        'postal_code' => $faker->postcode,
    ];
});
We’ll set the name of the location as the city name for this example.
Edit database/factories/LeadFactory.php to generate some leads. Let’s set about 1 in 20 leads as winners and set each lead to a random location.
<?php

use App\Location;
use Faker\Generator as Faker;

$factory->define(App\Lead::class, function (Faker $faker) {
    $location = Location::inRandomOrder()->first();

    // Create some time in last 4 weeks
    $created_at = $faker->dateTimeBetween('-4 weeks', 'now');

    // 1 in 20 chance of being a winner
    $winDate = null;
    $winner = rand(1, 20) == 1;
    if ( $winner ) {
        // Win sometime after being created but before now
        $winDate = $faker->dateTimeBetween($created_at, 'now');
    }
    return [
        'name' => $faker->name,
        'email' => $faker->email,
        'location_id' => $location->id,
        'is_winner' => $winDate,
        'created_at' => $created_at,
    ];
});
Now we can create and run seeds.
php artisan make:seeder LocationsTableSeeder
php artisan make:seeder LeadsTableSeeder
Update database/seeds/LocationsTableSeeder to create 12 locations:
factory(App\Location::class, 12)->create();
and database/seeds/LeadsTableSeeder to create a thousand leads.
factory(App\Lead::class, 1000)->create();
Now update database/seeds/DatabaseSeeder.php to run both seeders:
$this->call(LocationsTableSeeder::class);
$this->call(LeadsTableSeeder::class);
Finally, run the seeder:
php artisan db:seed
This may take a few moments. When it finishes, you’ll have 12 locations and 1000 leads in the database.
Nova Resources
Create resources for Locations and Leads.
php artisan nova:resource Location
php artisan nova:resource Lead
Open app/Nova/Location.php. Make sure the model is set to 'App\Location'. Set the $title to 'name'. For $search, let’s allow Nova users to search by name, address, city, state, and postal code.
public static $search = [
    'name',
    'address_1',
    'city',
    'state',
    'postal_code',
];
We’d like all the fields to be accessible in Nova. Let’s use ID, Text, and Place fields
use Laravel\Nova\Fields\ID;
use Laravel\Nova\Fields\Text;
use Laravel\Nova\Fields\Place;
and return this array for the fields() method:
return [
    ID::make()->sortable(),
    Text::make('Name'),
    Place::make('Address', 'address_1')->countries(['US', 'CA'])->hideFromIndex(),
    Text::make('Address Line 2', 'address_2')->hideFromIndex(),
    Text::make('City'),
    Text::make('State'),
    Text::make('Postal Code')->hideFromIndex(),
];
We haven’t used the Place field before. This is a neat field that uses the Algolia Places API to provide fast address searching and auto-completion. Even better, you do not need an Algolia account to use this field. We chained ->countries(['US', 'CA']) to the Place field to tell it to only search addresses in the US and Canada.
If you go to add a new Location in Nova, you get this popup while filling the address field:
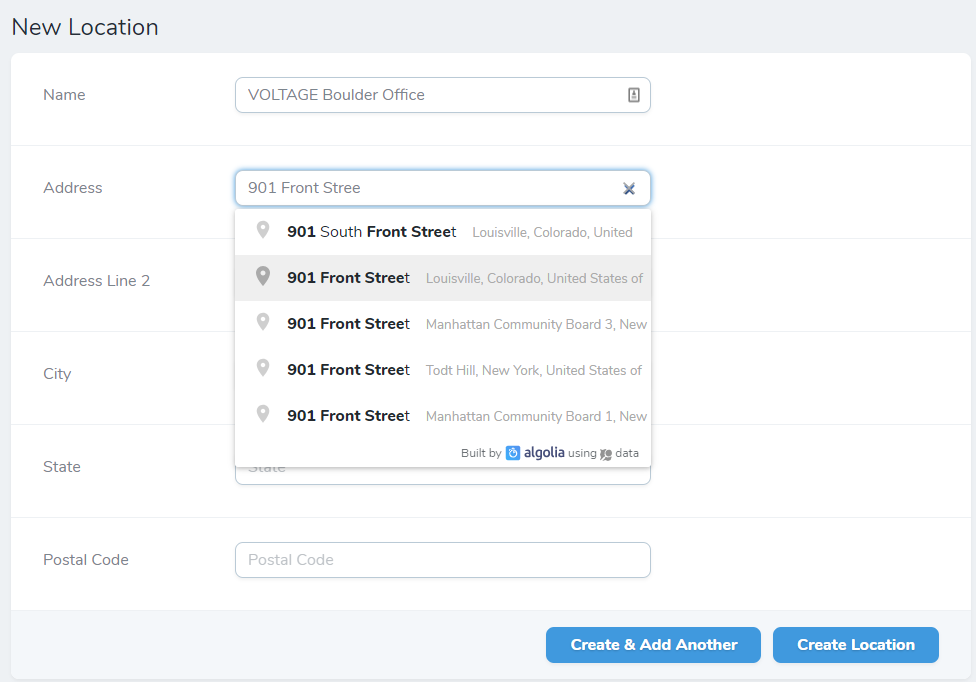
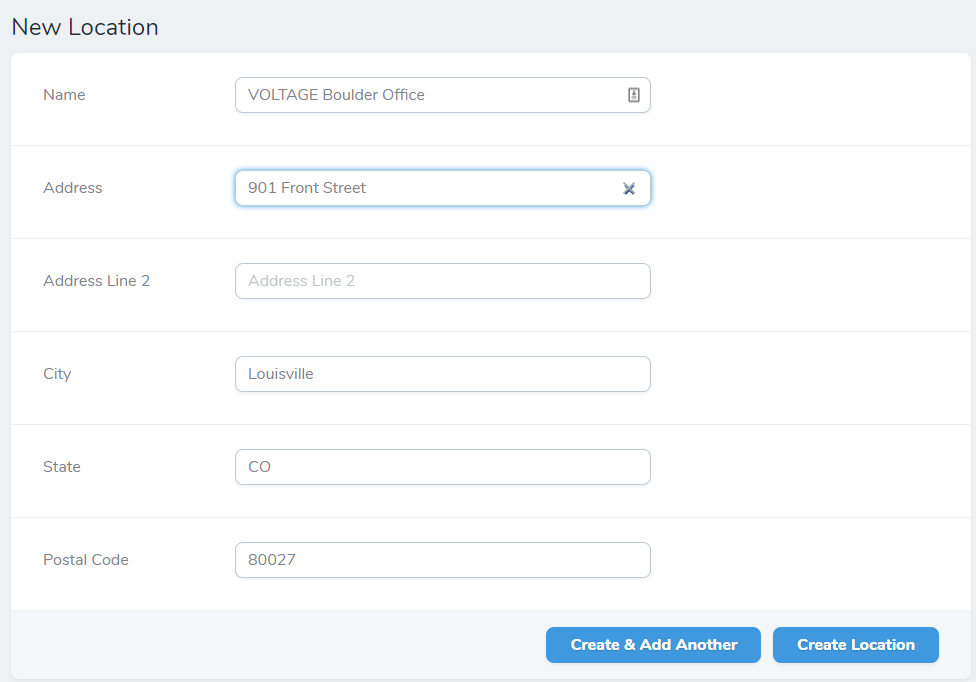
If you select a suggested option, Nova automatically fills in the remainder of the fields for you.
Now let’s update app/Nova/Lead.php. Set the $title to 'name' and $search to return name and email.
For the Lead’s fields, let’s make all fields available to Nova as well as the Location the Lead belongs to. For the resource index page, let’s hide the is_winner datetime and instead show a calculated boolean indicating whether or not the lead has won.
For the fields() method, return an array:
ID::make()->sortable(),
Text::make('Name'),
Text::make('Email'),
BelongsTo::make('Location'),
DateTime::make('Is Winner')->hideFromIndex(),
Boolean::make('Is Winner', function () {
    return $this->is_winner != null;
})->onlyOnIndex(),
Be sure to import all the used field types.
use Laravel\Nova\Fields\ID;
use Laravel\Nova\Fields\Text;
use Laravel\Nova\Fields\Boolean;
use Laravel\Nova\Fields\DateTime;
use Laravel\Nova\Fields\BelongsTo;
Since we want to use is_winner as a datetime in Nova, let’s have Eloquent cast it as a datetime for us. In app/Lead.php add:
protected $casts = [
    'is_winner' => 'datetime',
];
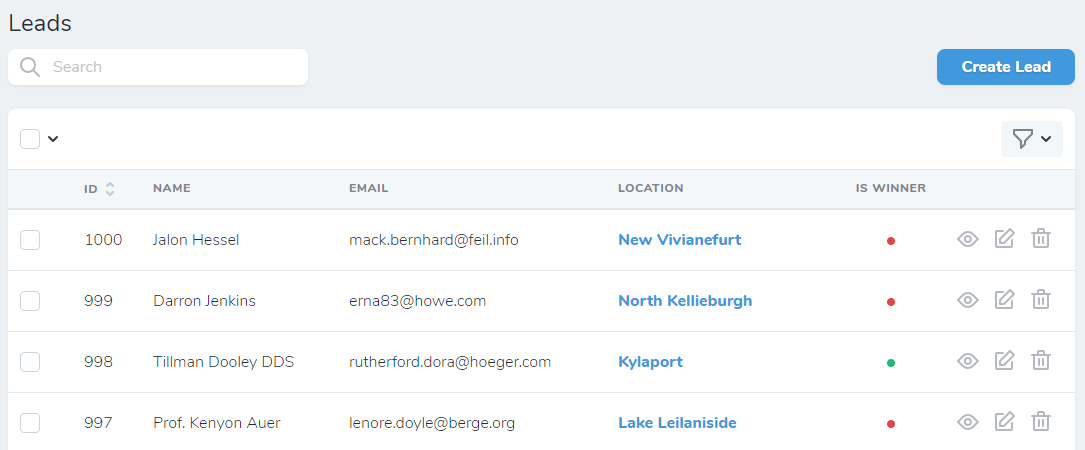
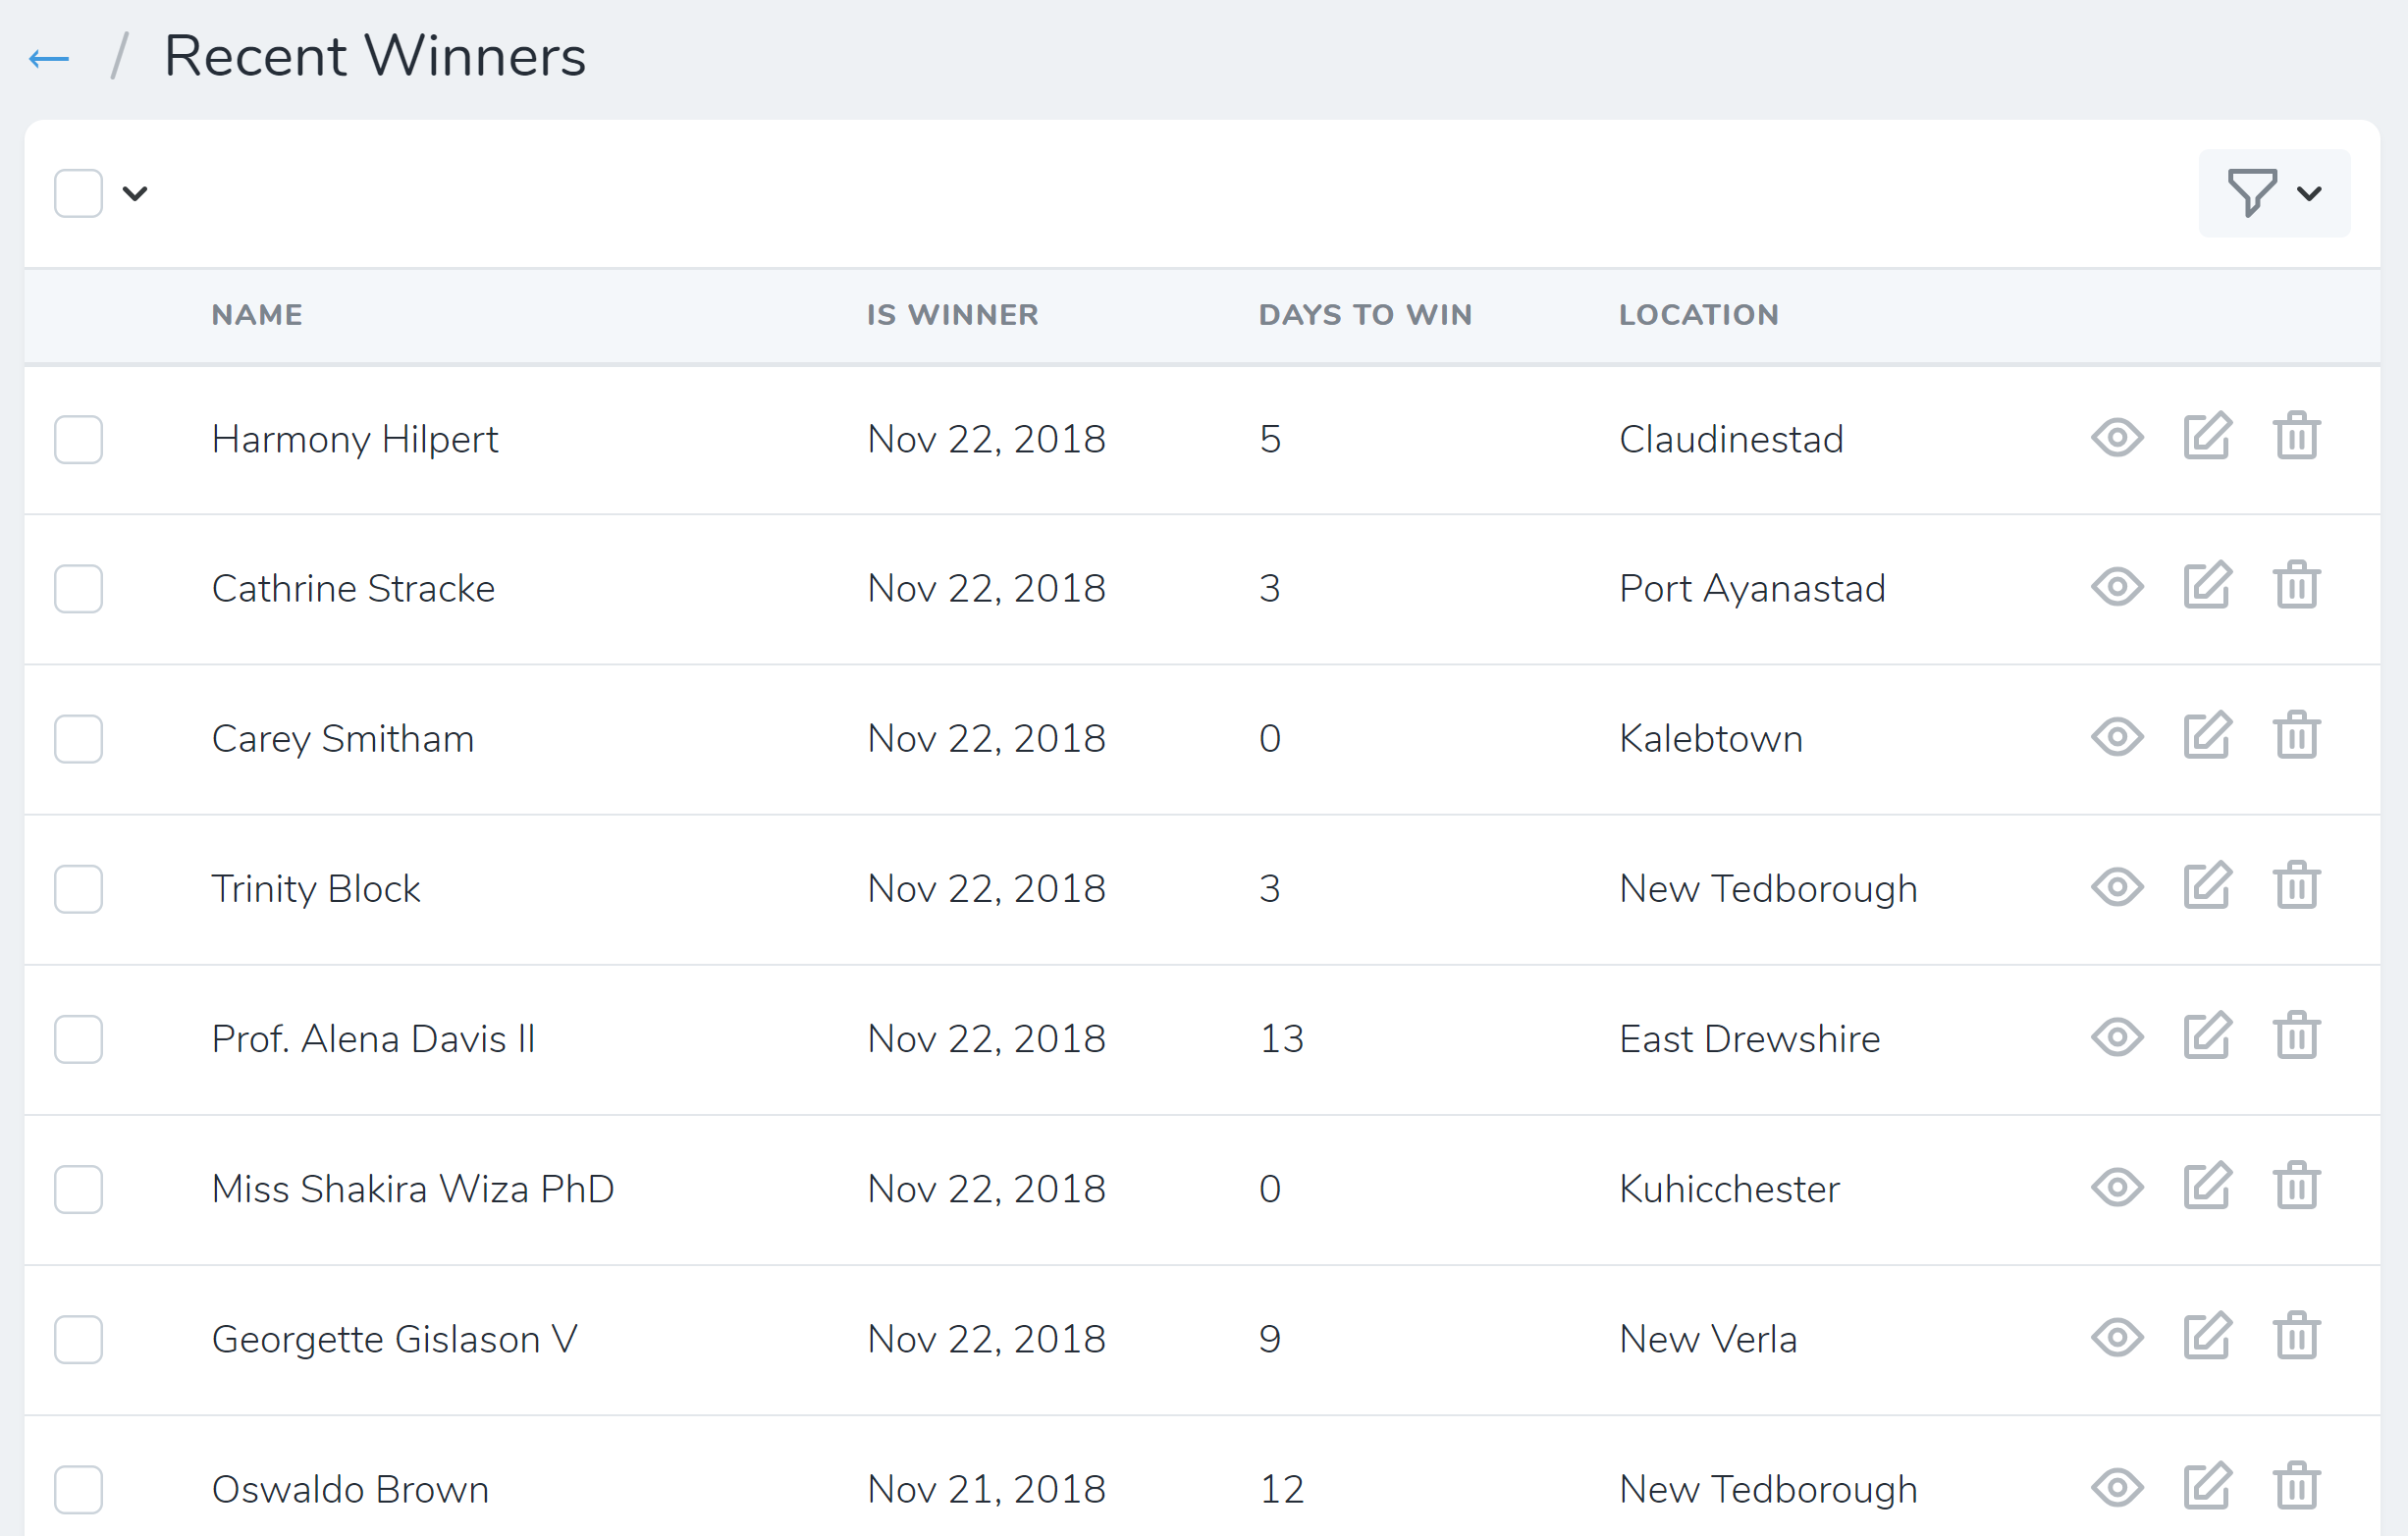
Now if you click on Leads in Nova you should see your randomly generated leads.
Filters
At this point we have Location and Lead models, database tables, seed data, and Nova resources. We’re ready to create our first filter. Nova filters are used to narrow the results shown on a resource index page. This is achieved by scoping Eloquent queries with custom conditions.
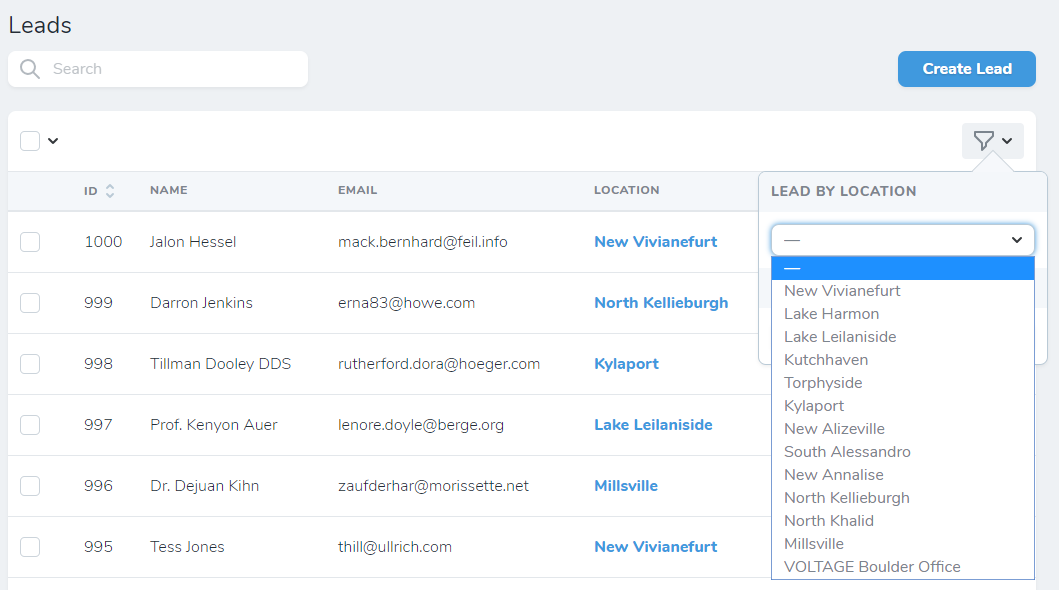
For example, let’s say we want to be able to view our leads by location. Begin by creating a new filter:
php artisan nova:filter LeadByLocation
This creates a file at app/Nova/Filters/LeadByLocation.php with two methods. The options() method lets us specify which select options will be available as filters for the leads. Update this method to return an array of all the locations where the array keys are the location names and the array values are the location IDs.
public function options(Request $request)
{
    $options = [];
    $locations = Location::all();
    foreach ( $locations as $location ) {
        $options[ $location->name ] = $location->id;
    }
    return $options;
}
Remember to include use App\Location;.
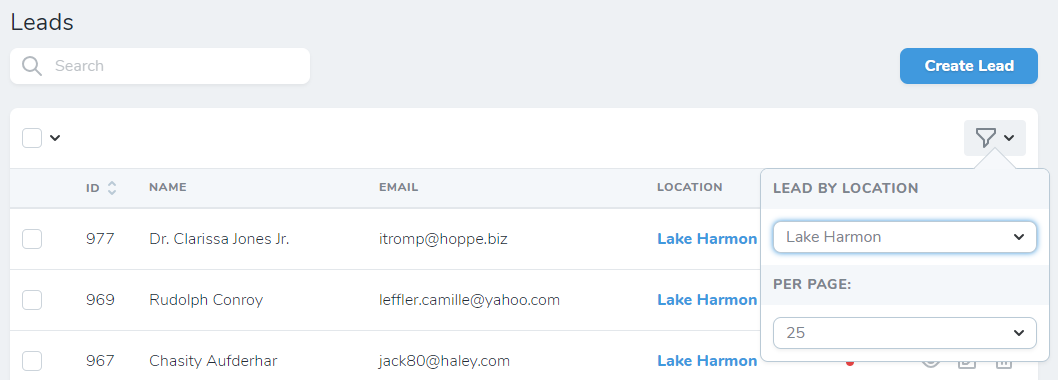
Now update the apply() method. This is where the Eloquent $query is passed in and scoped. For example, change this method to:
public function apply(Request $request, $query, $value)
{
    return $query->where('location_id', $value);
}
Now when a collection of Leads are passed into this filter, and option may be selected from the Locations array, and the selected location ID is passed into the where() scope on the Leads.
We’re ready to register this filter to the Lead resource. Open app/Nova/Lead.php and edit filters() to return:
return [
    new Filters\LeadByLocation,
];
Refresh the Leads index page and open the options in the top-right corner. You’ll see all the locations.
Select any location and only the leads attached to that location will show.
Actions
Nova actions let you perform tasks on Eloquent models. Actions can provide a lot of power to Nova users. In this demo let’s create an action that makes a lead a winner.
Begin by creating the action:
php artisan nova:action MakeLeadAWinner
This generates a file at app/Nova/Actions/MakeLeadAWinner.php. The handle() method is passed a collection of Eloquent models, even if only one model was selected by the Nova user. We can mark each model as a winner by importing use Carbon\Carbon; and updating hande() to:
public function handle(ActionFields $fields, Collection $models)
{
    foreach ($models as $model) {
        try {
            // Mark lead as a winner
            $model->is_winner = Carbon::now();
            $model->save();
        } catch (Exception $e) {
            $this->markAsFailed($model, $e);
        }
    }
}
Let’s register this action and see how it works. Open app/Nova/Lead.php and edit actions() to return:
return [
    new Actions\MakeLeadAWinner,
];
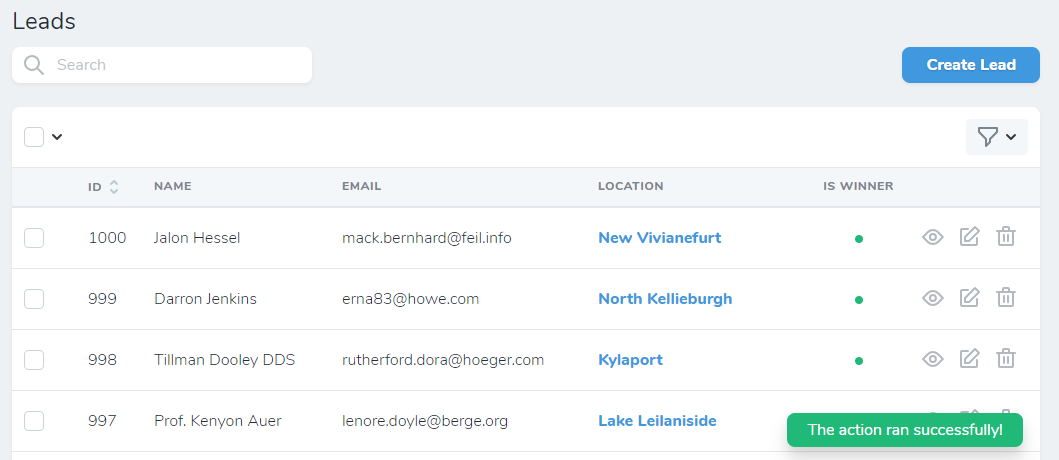
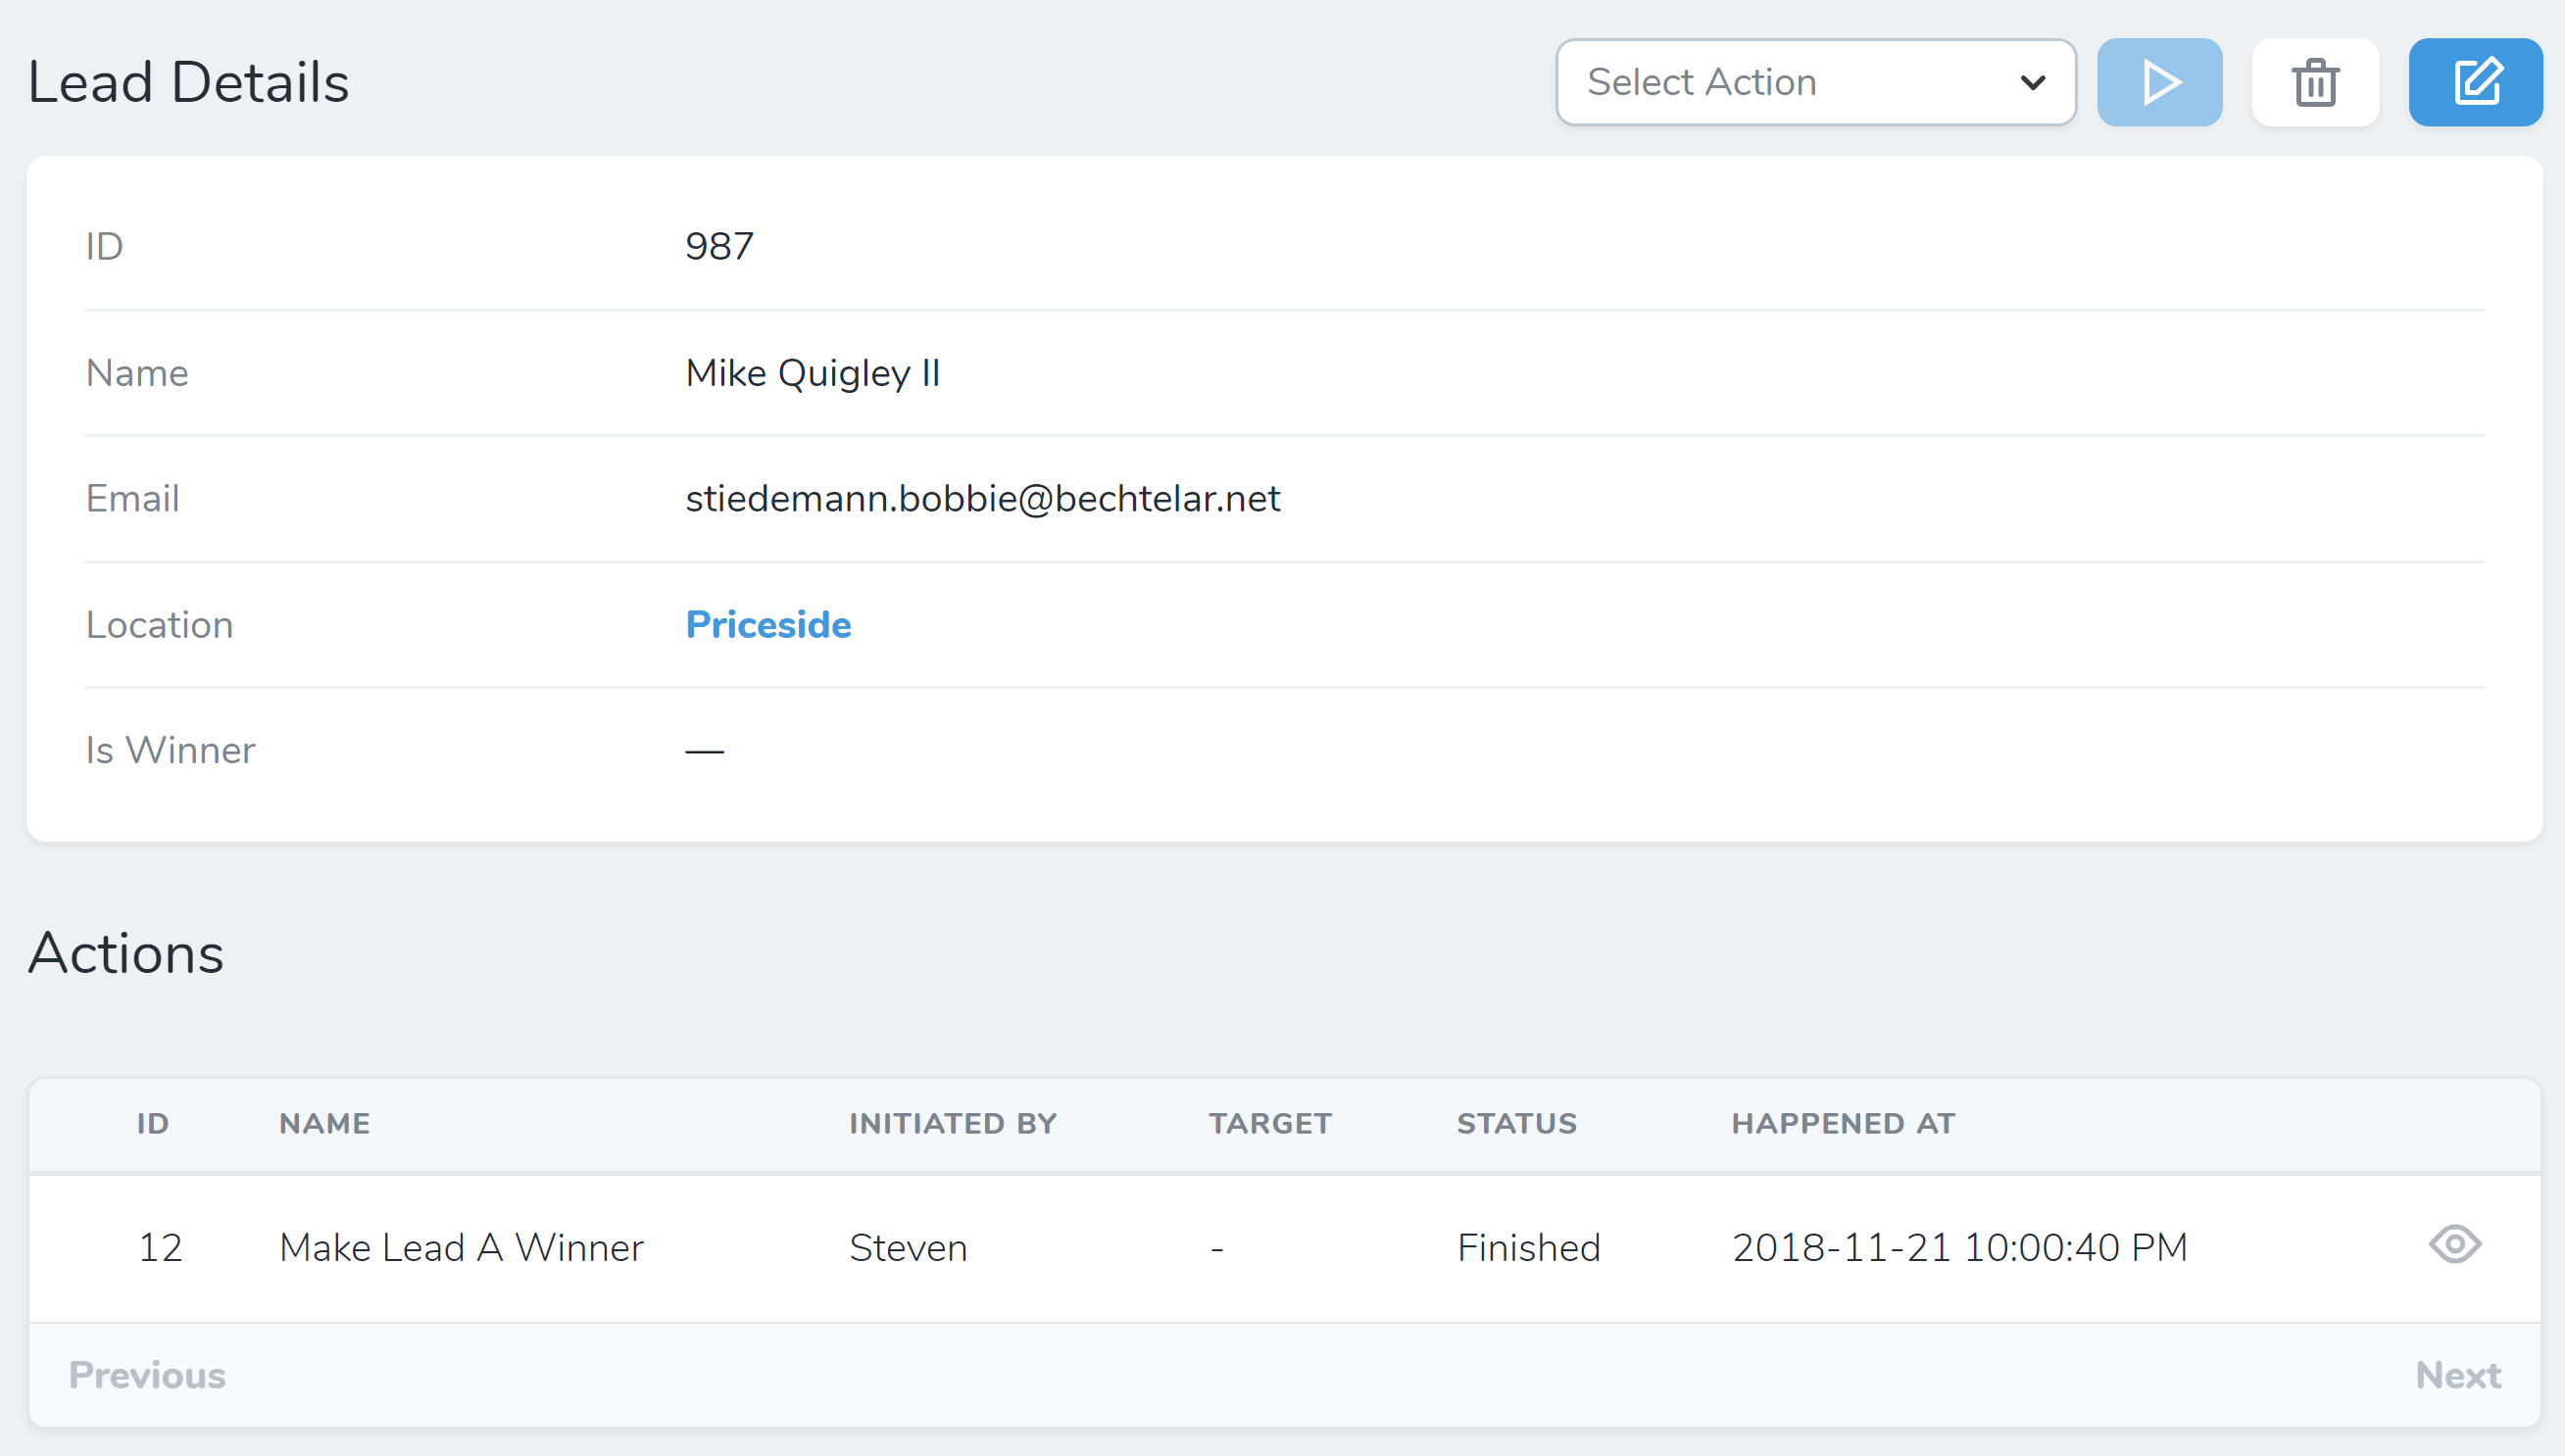
Refresh the Leads index listing and check one or more lead checkboxes.
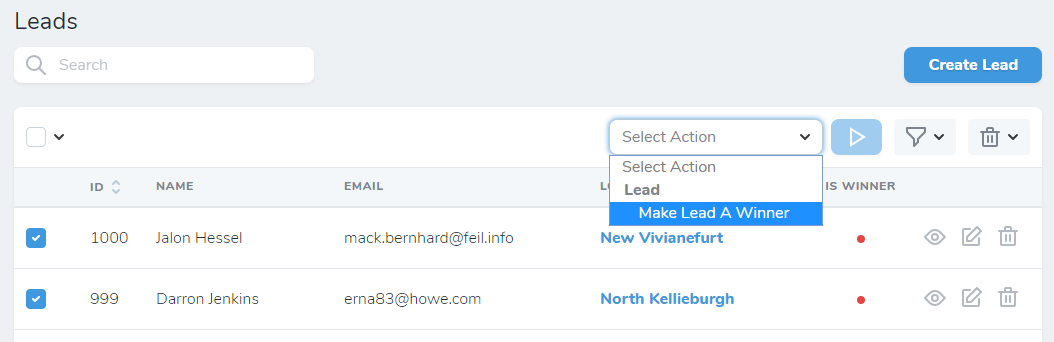
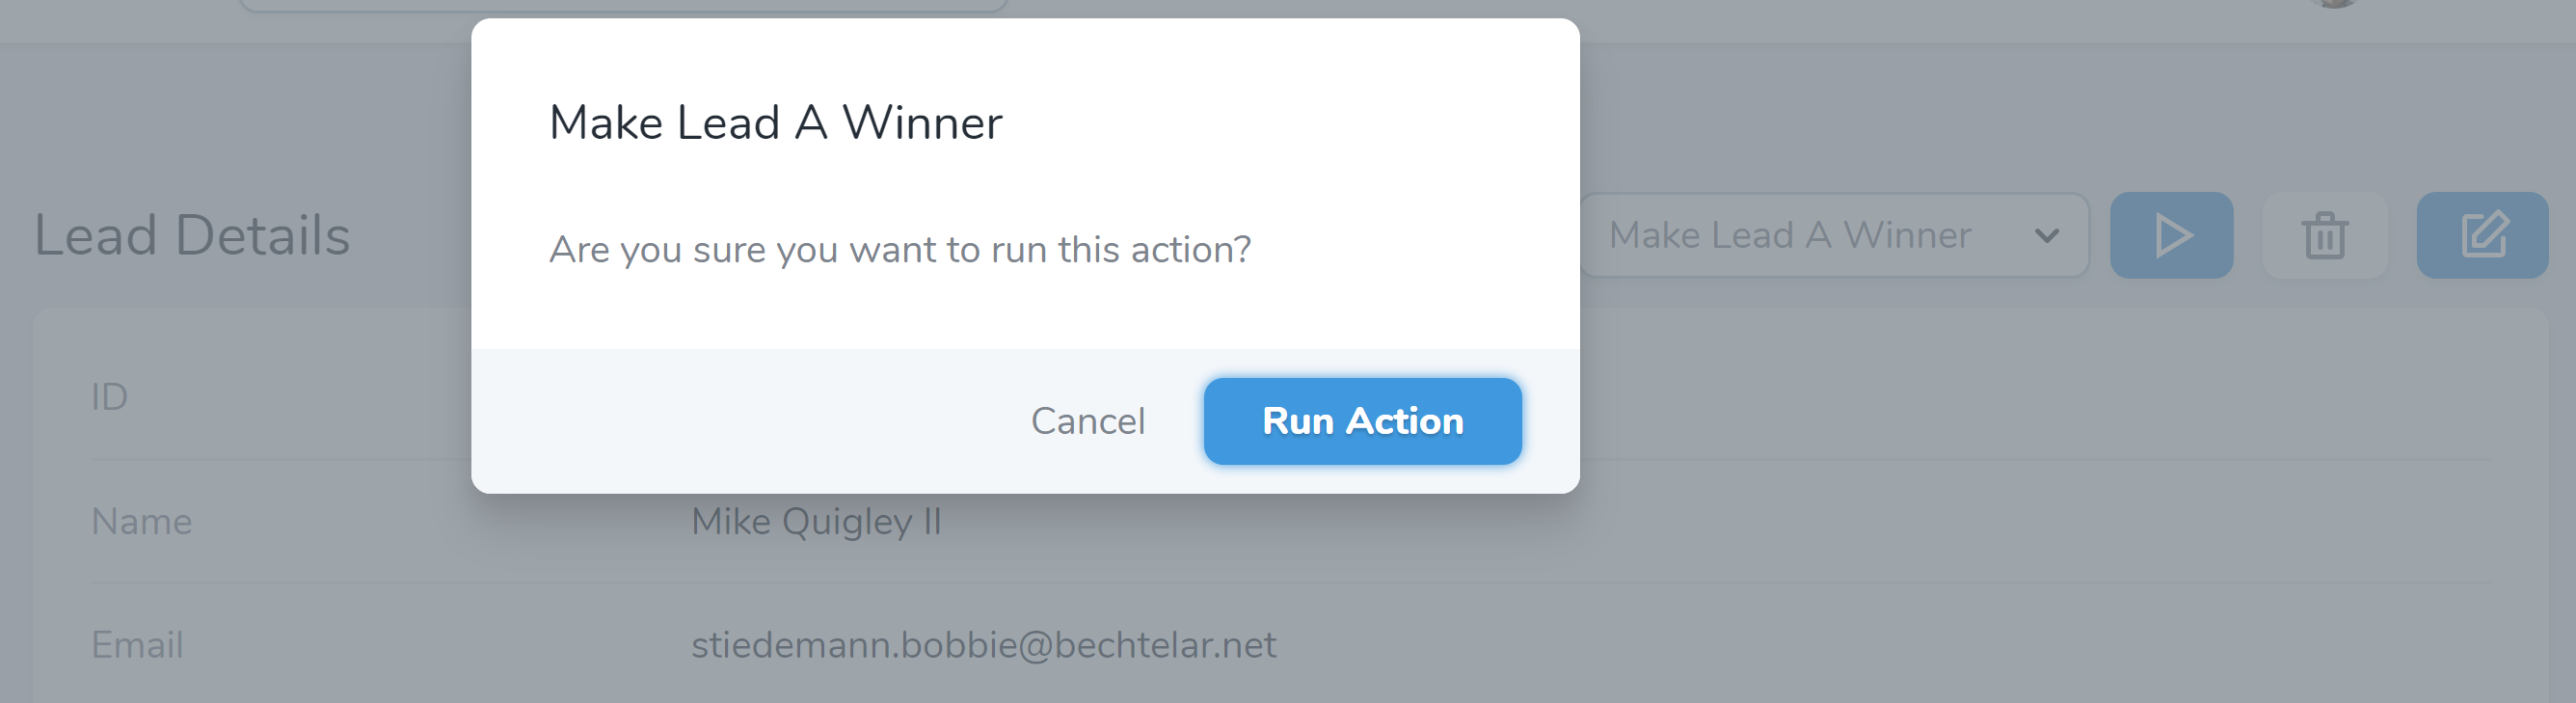
A dropdown titled Select Action appears with one action under Lead called Make Lead A Winner. Select that action and press the blue triangle button. You will see a confirmation box like this:
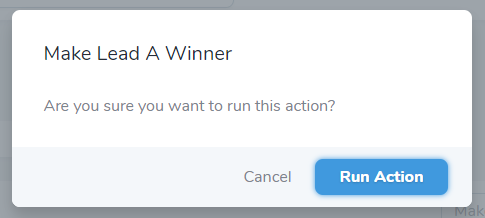
If you click Run Action you’ll get a green notification saying the action ran successfully. The Is Winner dots also automatically change from red to green.
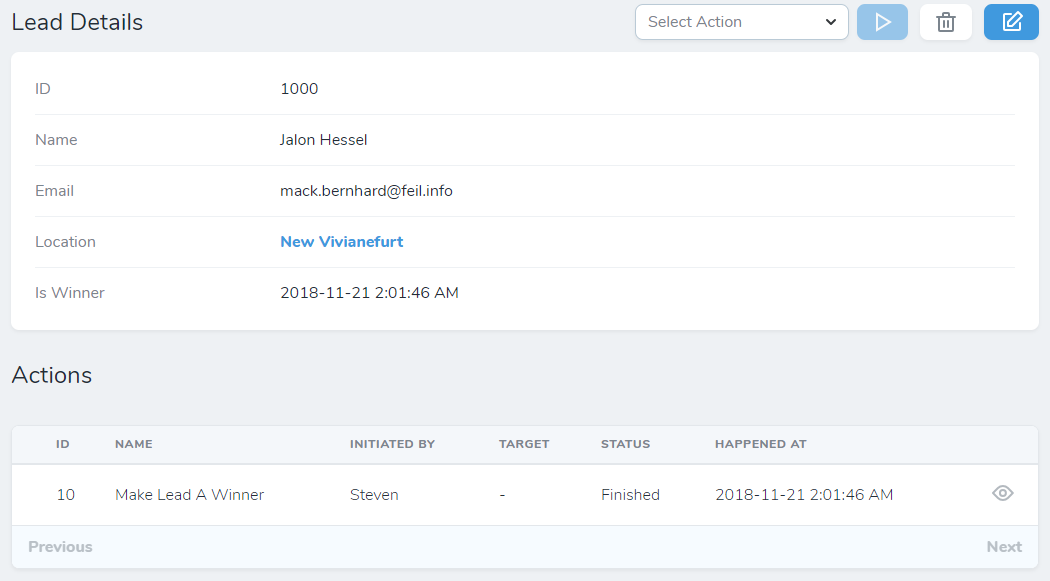
Action Log
Click on the the eye icon next to one of the leads you just made a winner to view it. It would be nice if we could see a log of all actions run on each resource. We can do this with the Laravel\Nova\Actions\Actionable trait. Edit app/Lead.php and have it use the Actionable trait:
<?php

namespace App;

use Laravel\Nova\Actions\Actionable;
use Illuminate\Database\Eloquent\Model;

class Lead extends Model
{
    use Actionable;
    ...
Refresh the lead detail page and you will now see an action log at the bottom of the page.
Queued Actions
Some actions may take a while to process, in which case we’d like to send them to the job queue. This is accomplished by implementing Illuminate\Contracts\Queue\ShouldQueue. Edit app/Nova/Actoins/MakeLeadAWinner.php and add the contract:
class MakeLeadAWinner extends Action implements ShouldQueue
The action will use the default Laravel queue. The documentation seems to be incorrect on how to do this. To set a queue for the action, add this constructor. We’ll use Homestead’s redis queue for this example by adding this constructor to MakeLeadAWinner:
public function __construct() {
    $this->onConnection('redis');
}
Let’s also modify the action to do more than just mark the lead as a winner. Let’s have the action also send an email to the lead to let them know they have won.
php artisan make:mail CongratulateWinner --markdown=email.congratulate-winner-content
Open app/Mail/CongratulateWinner.php. Let’s make the Lead model public so it is accessible to the view. We could also generate some action URL to place in the email. Our mailable might look something like this:
<?php

namespace App\Mail;

use Illuminate\Bus\Queueable;
use Illuminate\Mail\Mailable;
use Illuminate\Queue\SerializesModels;
use Illuminate\Contracts\Queue\ShouldQueue;

use App\Lead;

class CongratulateWinner extends Mailable
{
    use Queueable, SerializesModels;

    public $lead;
    public $actionUrl;

    /**
     * Create a new message instance.
     *
     * @return void
     */
    public function __construct(Lead $lead)
    {
        $this->lead = $lead;
        $this->actionUrl = 'https://action-to-controller-here';
    }

    /**
     * Build the message.
     *
     * @return $this
     */
    public function build()
    {
        return $this->markdown('email.congratulate-winner-content');
    }
}
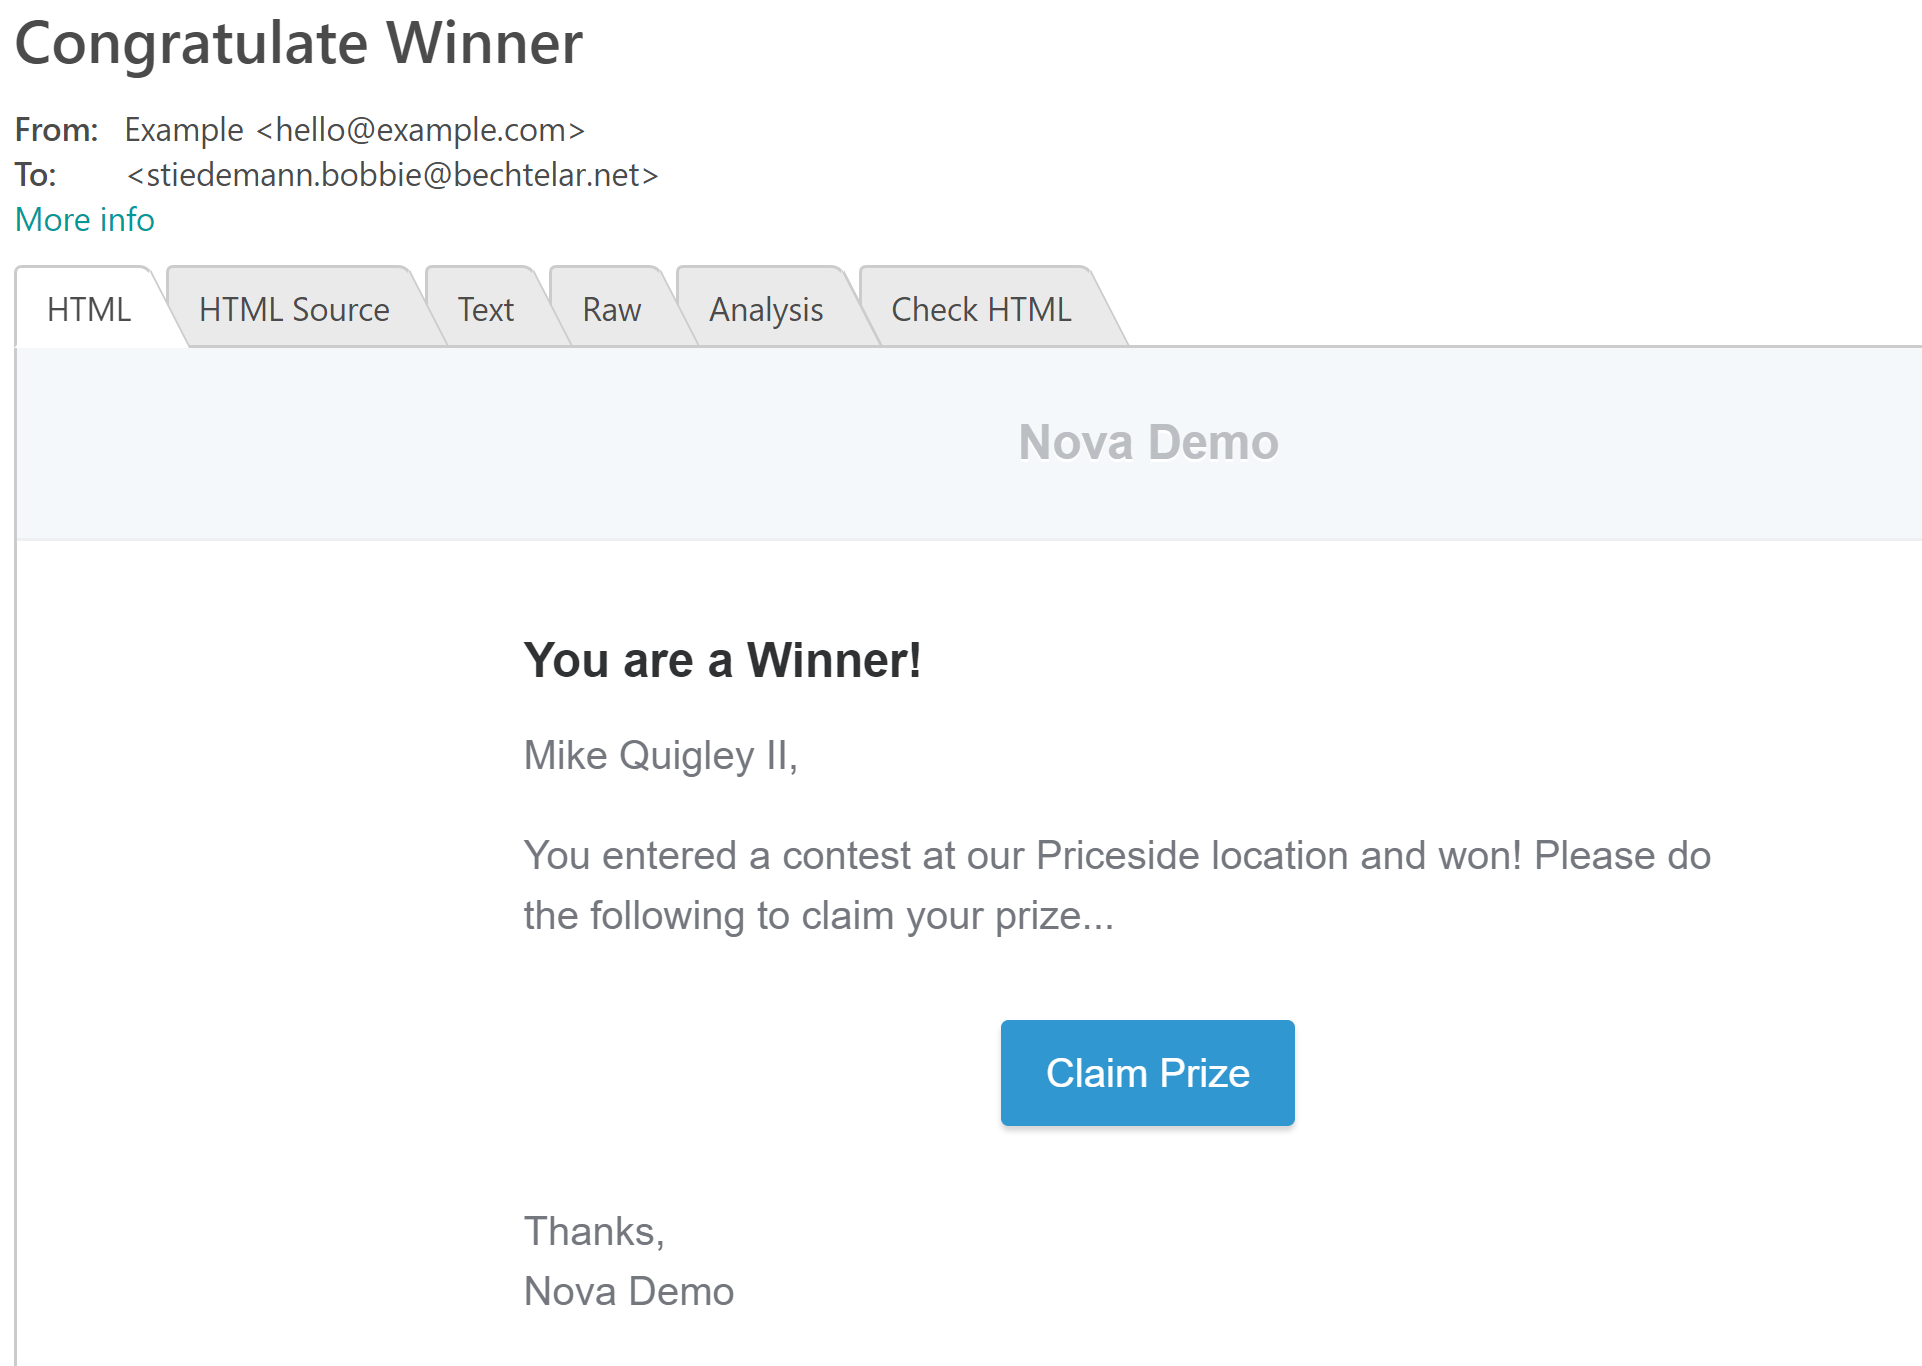
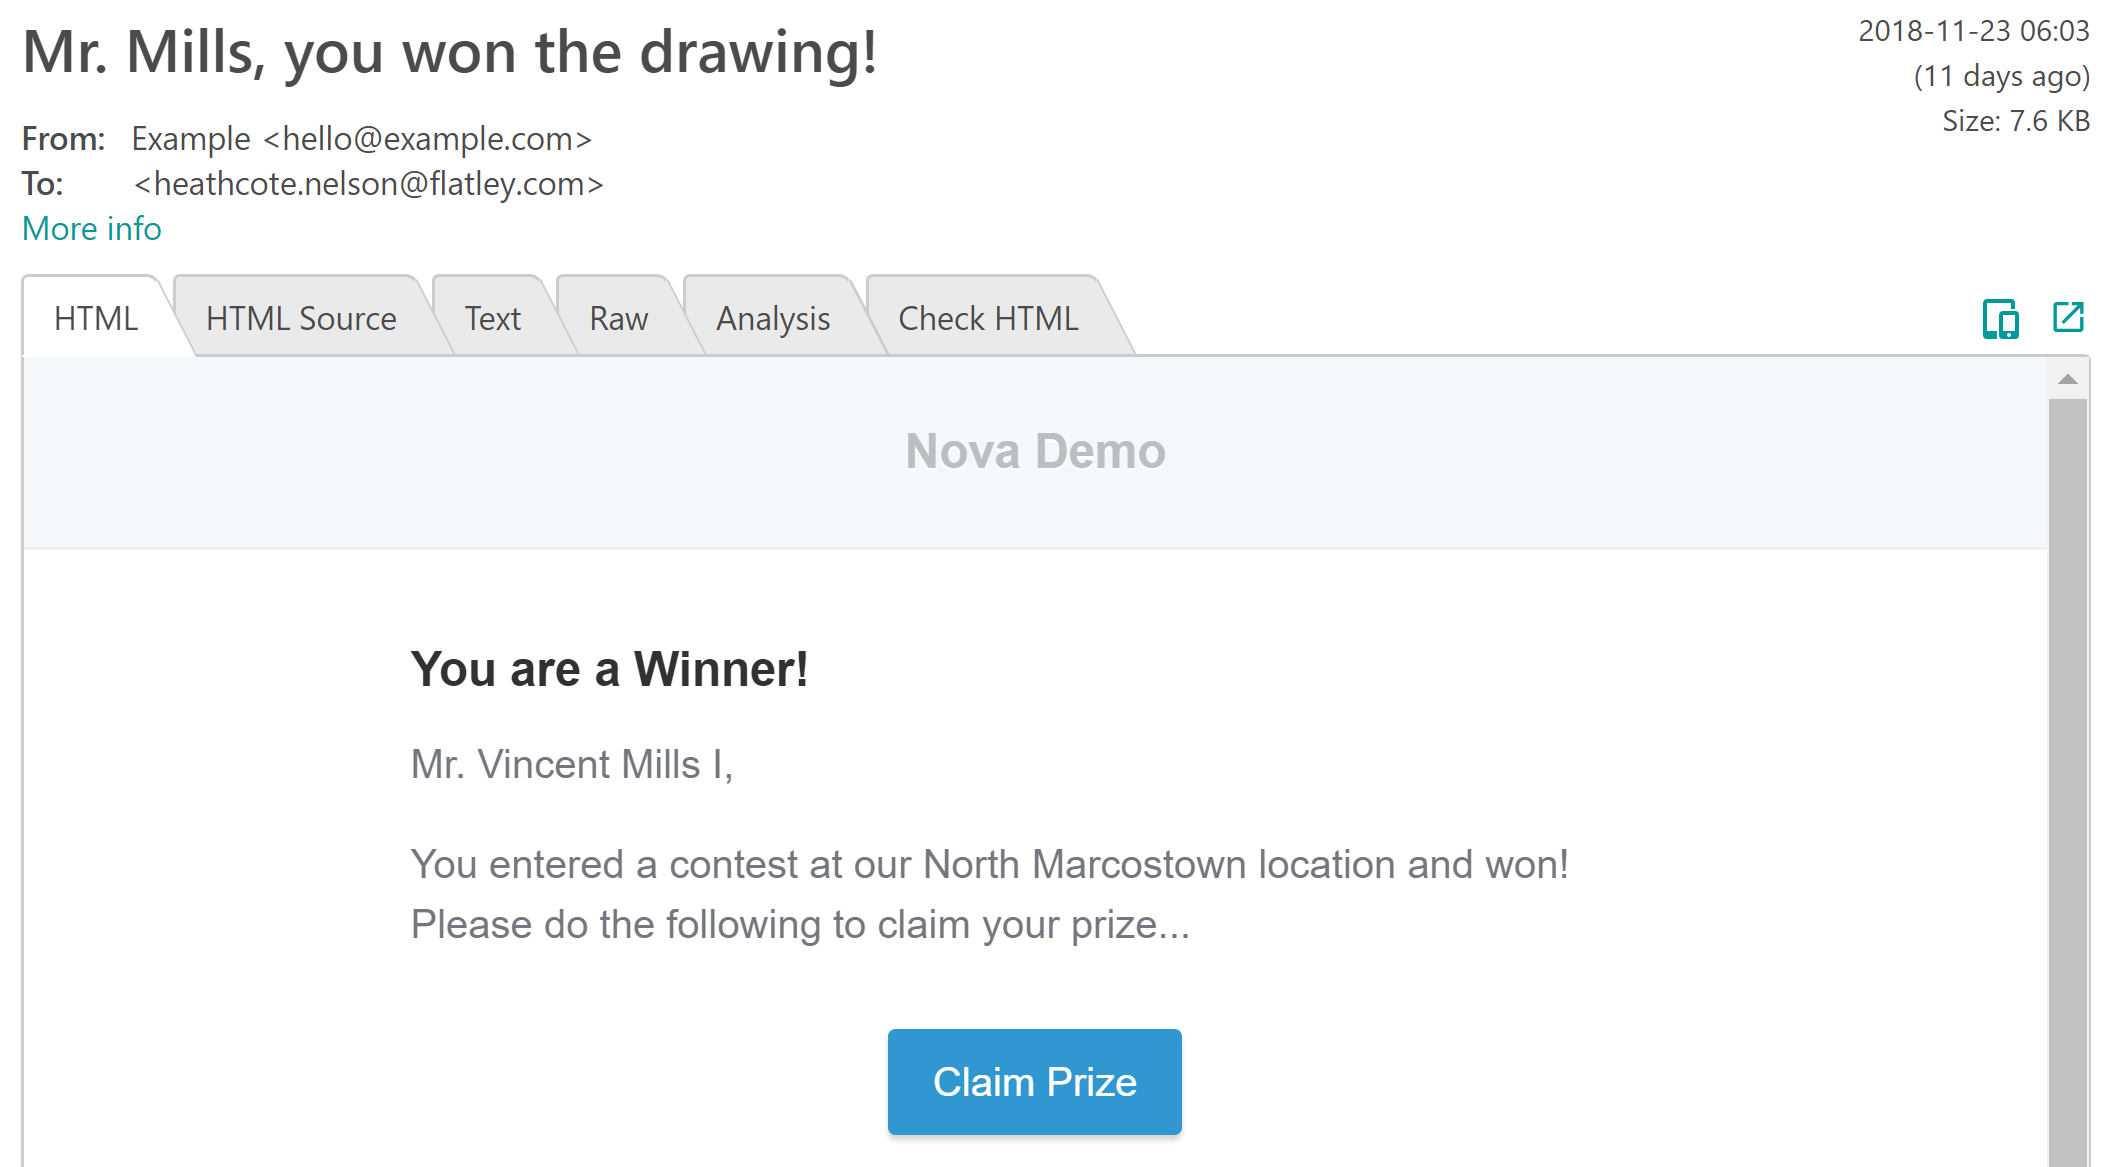
Now edit the markdown view at resources/views/email/congratulate-winner-content.php.
@component('mail::message')
# You are a Winner!

{{ $lead->name }},

You entered a contest at our {{ $lead->location->name }} location and won!  Please do the following to claim your prize...

@component('mail::button', ['url' => $actionUrl])
Claim Prize
@endcomponent

Thanks,
{{ config('app.name') }}
@endcomponent
Assuming you are using mailtrap as your development mail server and have configured your MAIL_USERNAME and MAIL_PASSWORD in .env, you should be ready to test email.
To use the Redis queue, we need the predis driver.
composer require predis/predis ~1.0
Now make sure the queue is on by editing your .env file and setting QUEUE_CONNECTION=redis. Then listen using
php artisan queue:work
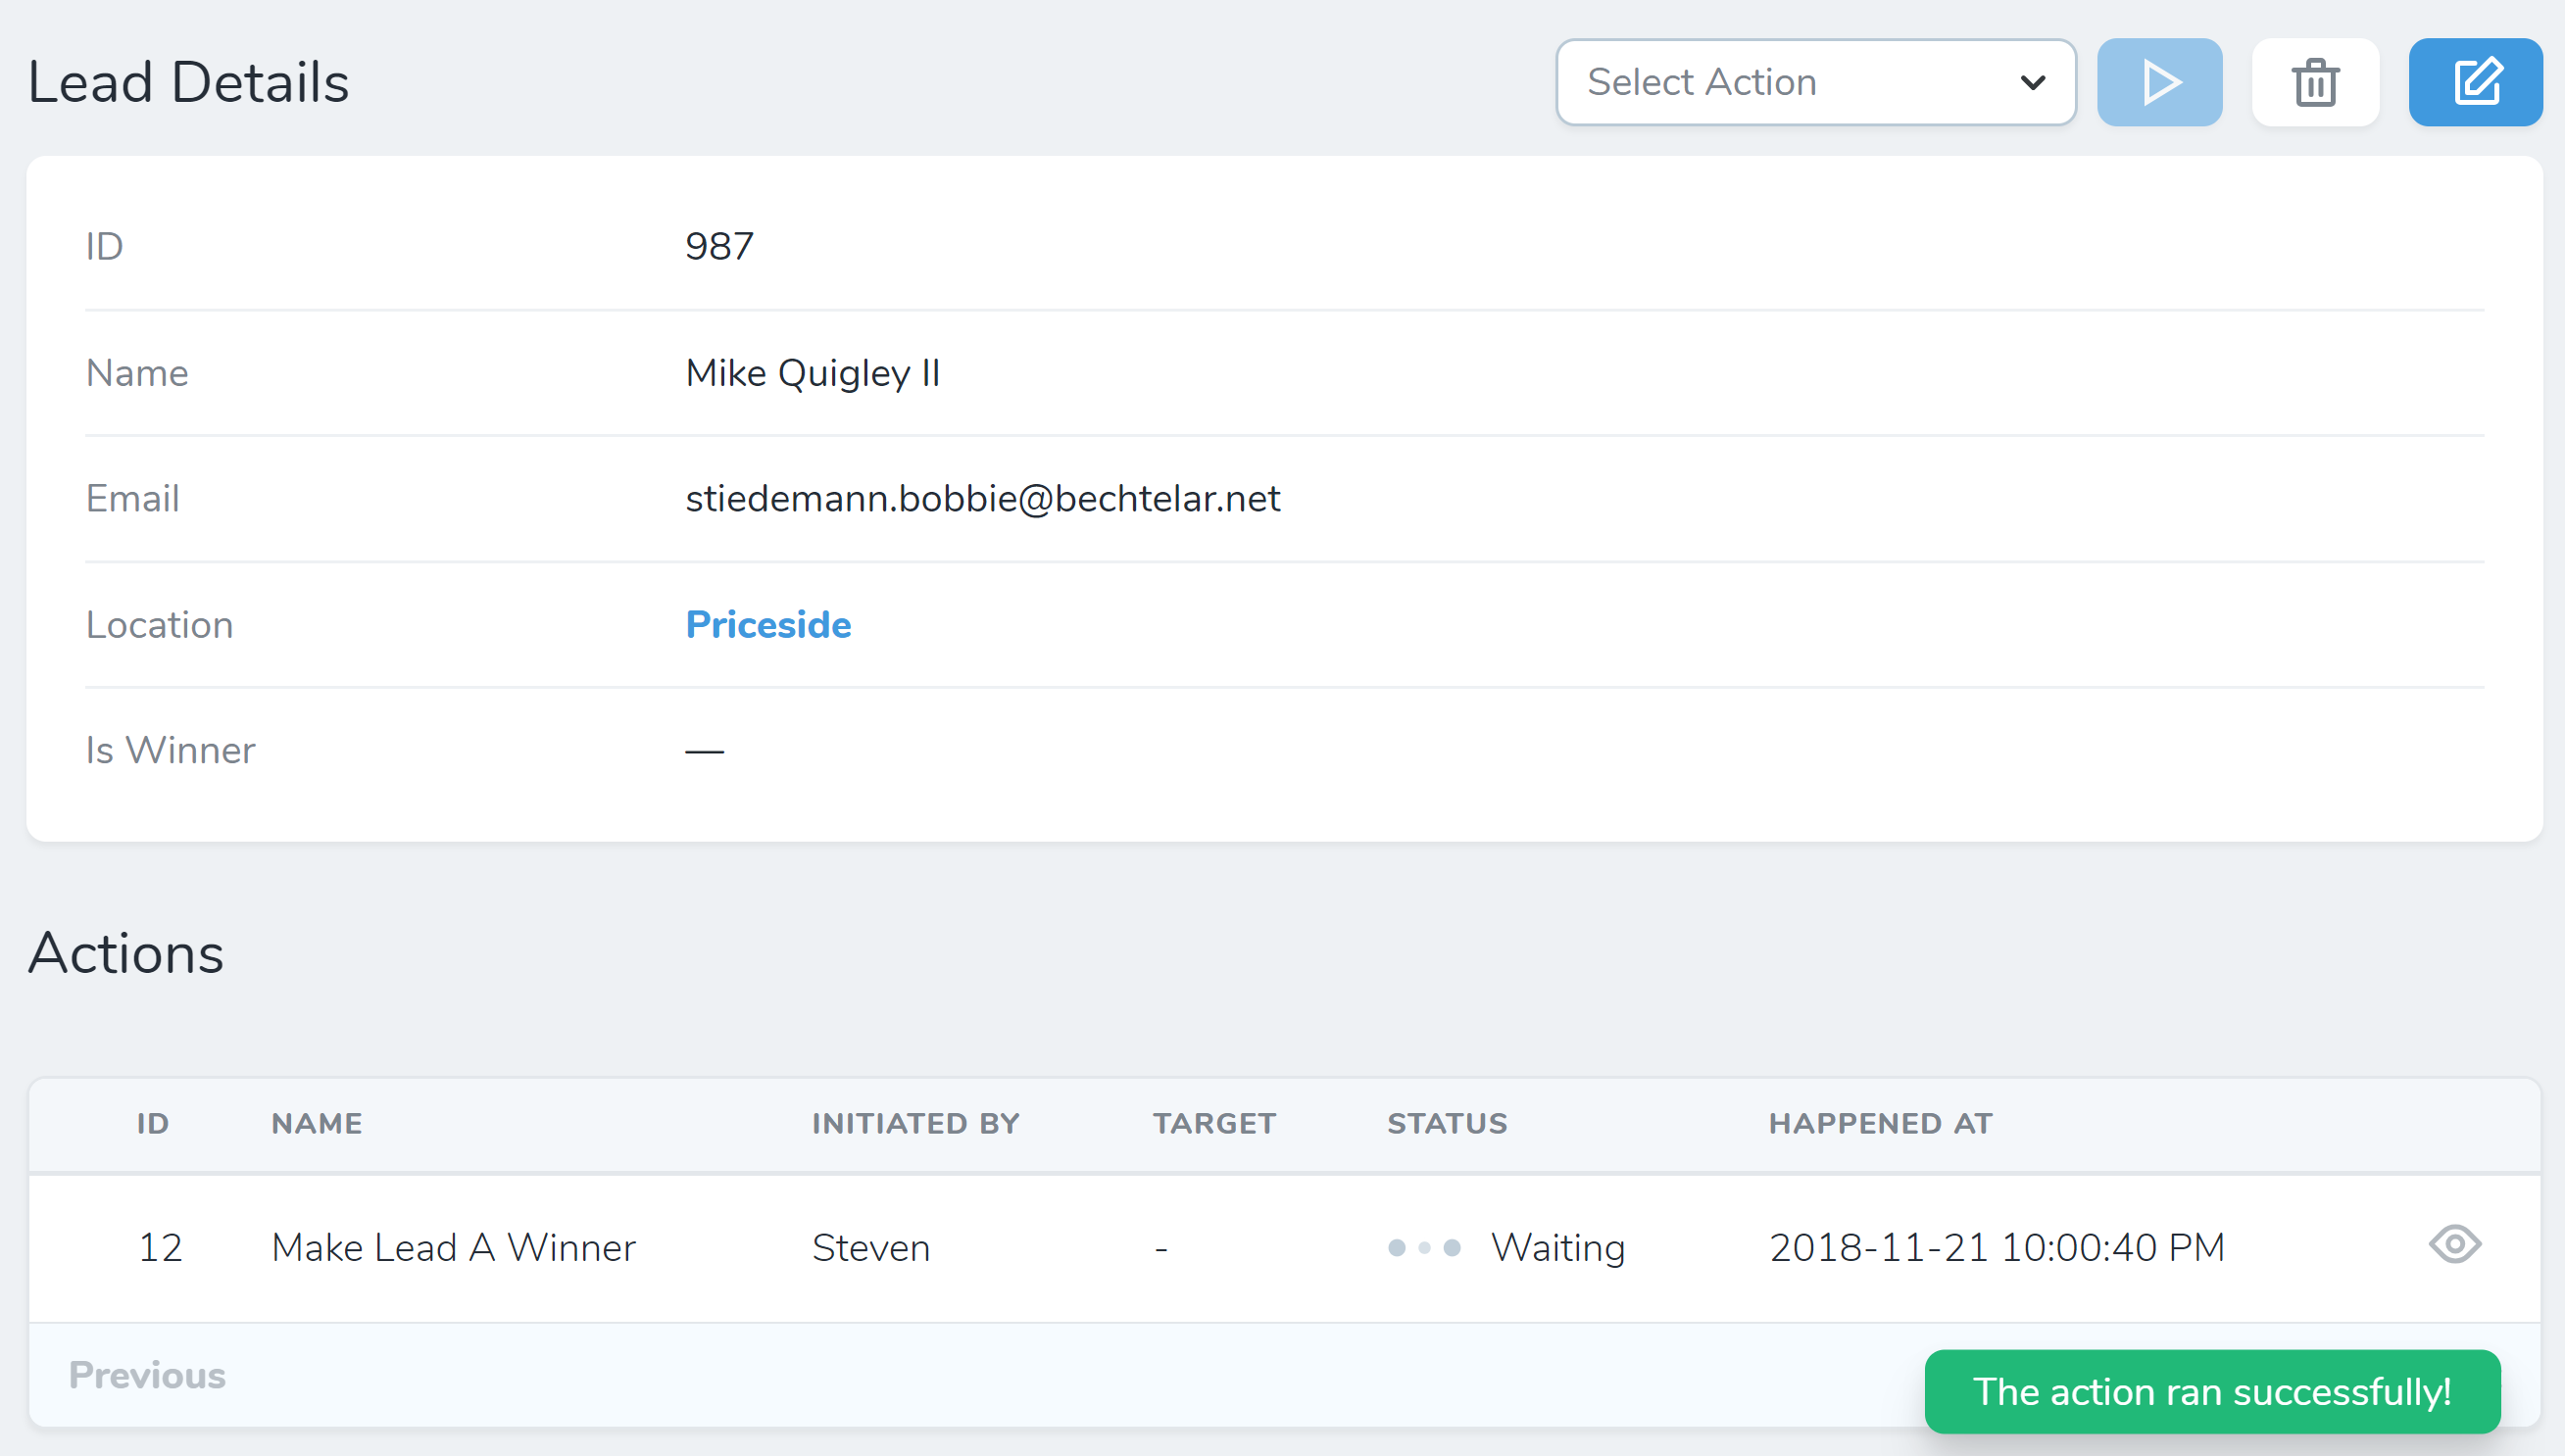
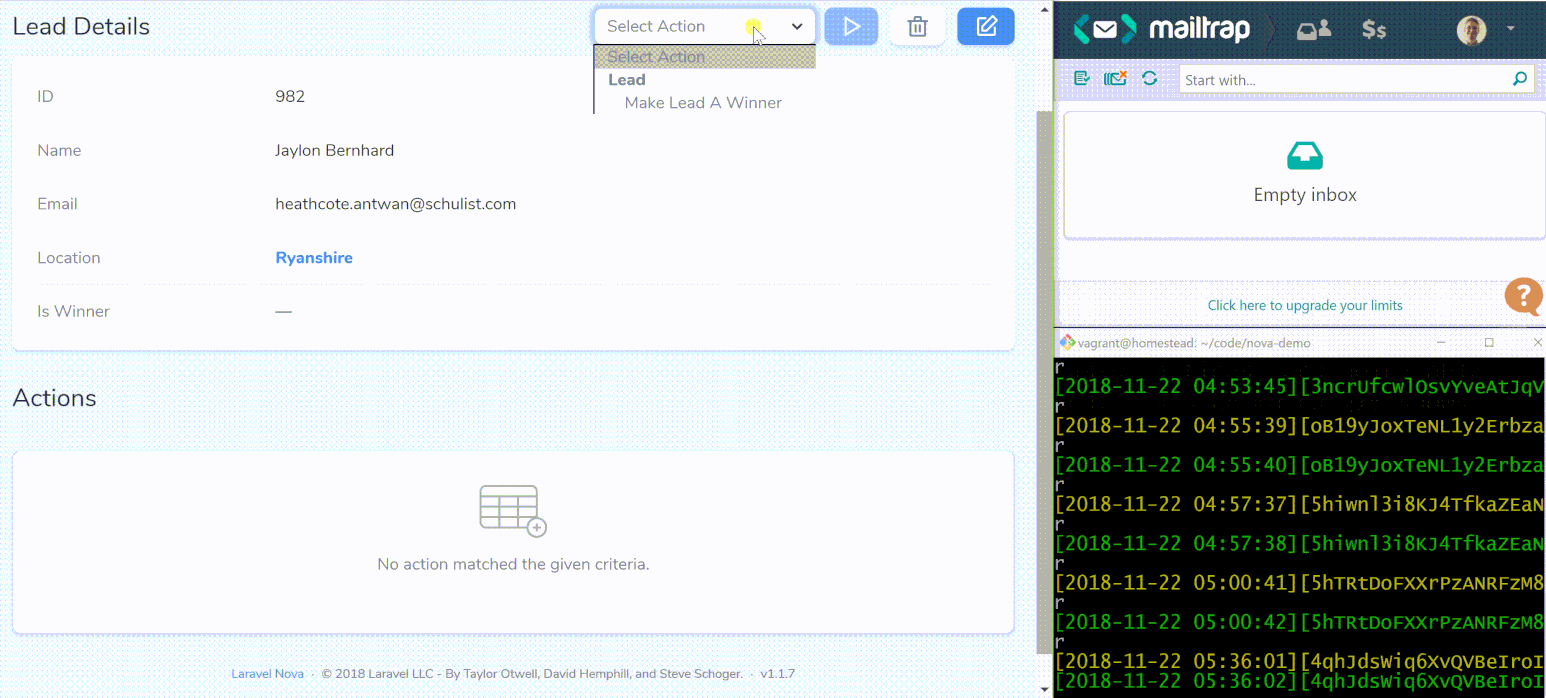
Finally we can test queued actions. We can run actions on multiple leads from the lead index page or on a single lead from the lead details page. To do this, find a lead that is not a winner on the lead index page and click on the View icon to get to the lead detail page. Select Make Lead A Winner, and press the blue triangle button. Click Run Action from the confirm box.
The green notification immediately opens saying This action ran successfully. This actually means that the action was queued successfully. The action status shows Waiting.
Looking at the console we see the job is immediately processed.

Watching the lead detail page, the action status changes to Finished in real time without needing to refresh the browser.
Checking in mailtrap, we see the email sent successfully.
Queued actions are extremely useful for running long tasks (actions) and being able to see when tasks are running and when they are finished. This animated gif shows the full process of running a queued action.
Action Responses
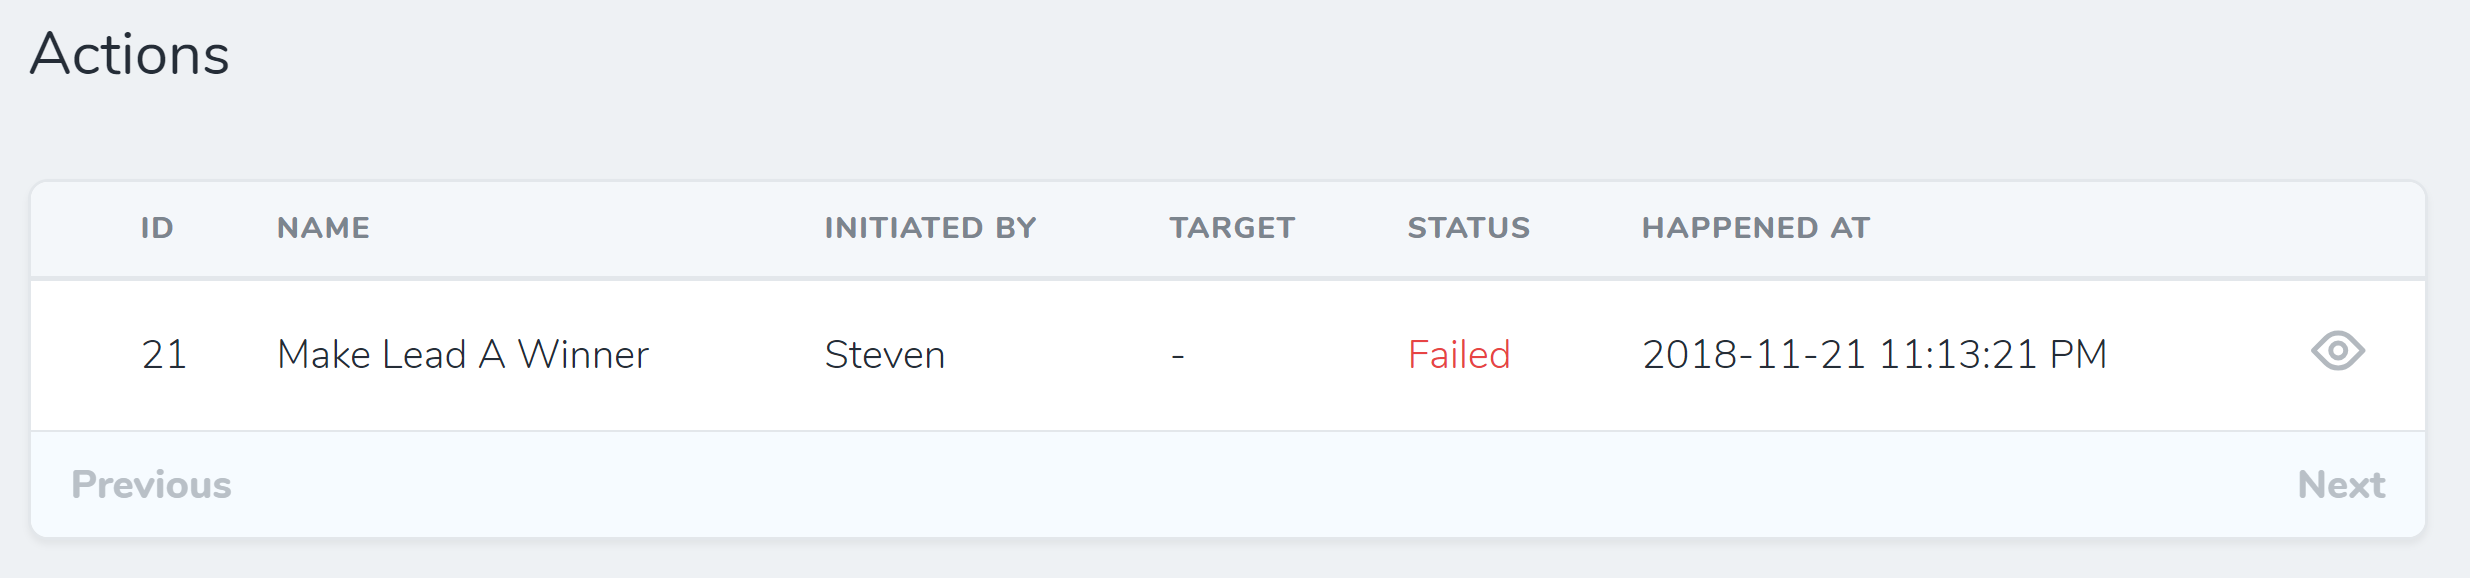
Nova gives us the ability to send messages to the UI and to even mark actions as failed. If we were to edit app/Nova/Actions/MakeLeadAWinner.php and cause it to throw an exception, our exception handler would mark the action as failed. For example, update the hande() method to:
foreach ($models as $model) {
    try {
        throw new \Exception("Something went wrong");
        ...
Kill and restart the queue so the updated MakeLeadAWinner job is loaded. This time let’s put a maximum number of retries so our failed job doesn’t get re-queued and retried indefinitely.
php artisan queue:work --tries=3
Now run the action on any lead. We still immediately get the message that the action was successful because the action was successfully queued. However we see that the job fails in the queue three times before aborting.

Then the lead detail page updates with a status of Failed.
For the sake of the demo, be sure to remove throw new \Exception("Something went wrong"); and restart the queue after seeing this functionality.
Action Fields
The last topic we’ll cover for actions is how to send input into an action using action fields. Let’s say we want to customize the subject line of the email we send to the winner. We can add a field to app/Nova/Actions/MakeLeadAWinner.php in the fields() method.
return [
    Text::make('Subject'),
];
Be sure to include use Laravel\Nova\Fields\Text; for the Nova field.
We could add as many fields as we’d like and use the same validation rules available to us for Nova resources.
In this case, let’s take the Subject input and use it in our email template. In app/Nova/Actions/MakeLeadAWinner.php notice that the handle() method passes in ActionFields $fields. This object contains all the fields passed by the front-end as properties. To access the subject line field, change:
Mail::to($model->email)->send(new CongratulateWinner($model));
to
Mail::to($model->email)->send(new CongratulateWinner($model, $fields->subject));
Next, open app/Mail/CongratulateWinner.php and update it to use the subject field like so:
<?php

namespace App\Mail;

use Illuminate\Bus\Queueable;
use Illuminate\Mail\Mailable;
use Illuminate\Queue\SerializesModels;
use Illuminate\Contracts\Queue\ShouldQueue;

use App\Lead;

class CongratulateWinner extends Mailable
{
    use Queueable, SerializesModels;

    public $lead;
    public $actionUrl;
    public $subject;

    /**
     * Create a new message instance.
     *
     * @return void
     */
    public function __construct(Lead $lead, $subject = 'Congratulations')
    {
        $this->lead = $lead;
        $this->actionUrl = 'https://action-to-controller-here';
        $this->subject = $subject;
    }

    /**
     * Build the message.
     *
     * @return $this
     */
    public function build()
    {
        return $this->markdown('email.congratulate-winner-content')->subject($this->subject);
    }
}
Now, whenever this mailable is invoked, the subject line is set to the action input.
Let’s test this out. Be sure to restart the work queue:
php artisan queue:work --tries=3
Return to the browser, find a lead, and click Make Lead A Winner. We see our action fields pop open.
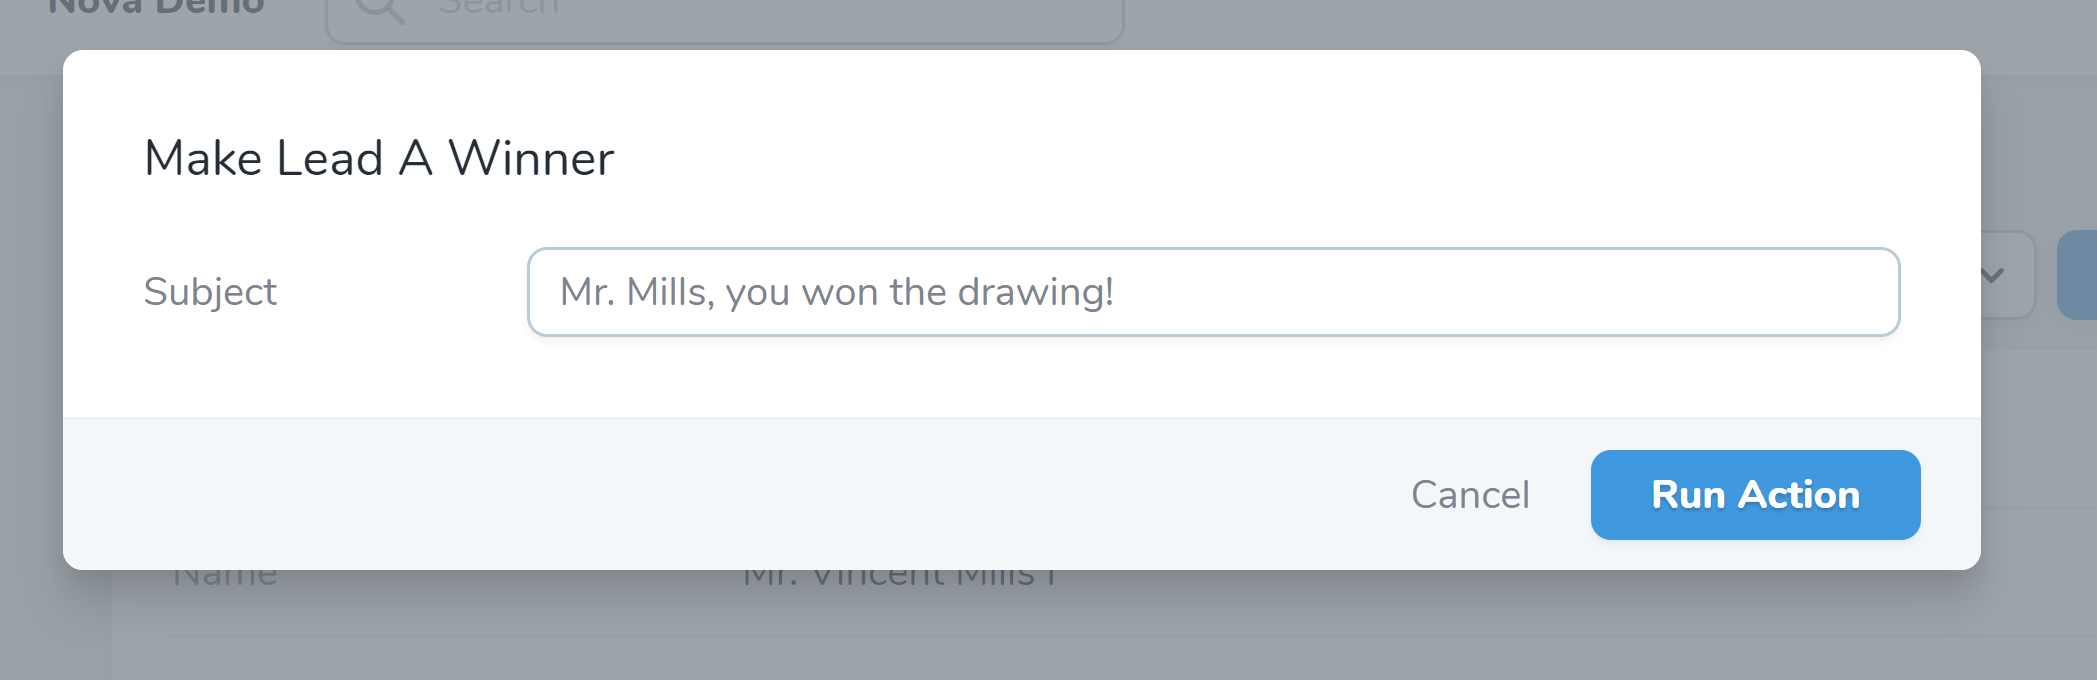
Add a subject line and click Run Action. Assuming the queue is running, an email is sent with the subject line we entered.
The ability to provide input to any action gives us a lot of flexibility in providing CRM-like features.
Lenses
Let’s say we want a page where we can see all the contest winners who have won in the past week. Technically, we could add some filters to the Lead Nova resource to filter by winners and by week. Any time we wanted to see the recent winners we’d have to re-apply these filters. What if we’d also like to show different fields on the resource listing page such as when they won or how long it took to convert the lead to a winner?
This requires a special type of filter called a Lens Filter. A Lens gives us a direct listing to a resource defined by a fully customized Eloquent query. This can be particularly useful when your results require joining multiple database tables together.
Start by creating a lens:
php artisan nova:lens RecentWinners
This generates a file at app/Nova/Lenses/RecentWinners.php. This class looks like a Nova resource class mashed together with a Nova filter class. Before we start to fill it out, let’s attach it to the Lead Nova resource. Open app/Nova/Lead.php and in the lenses() method return:
return [
    new Lenses\RecentWinners,
];
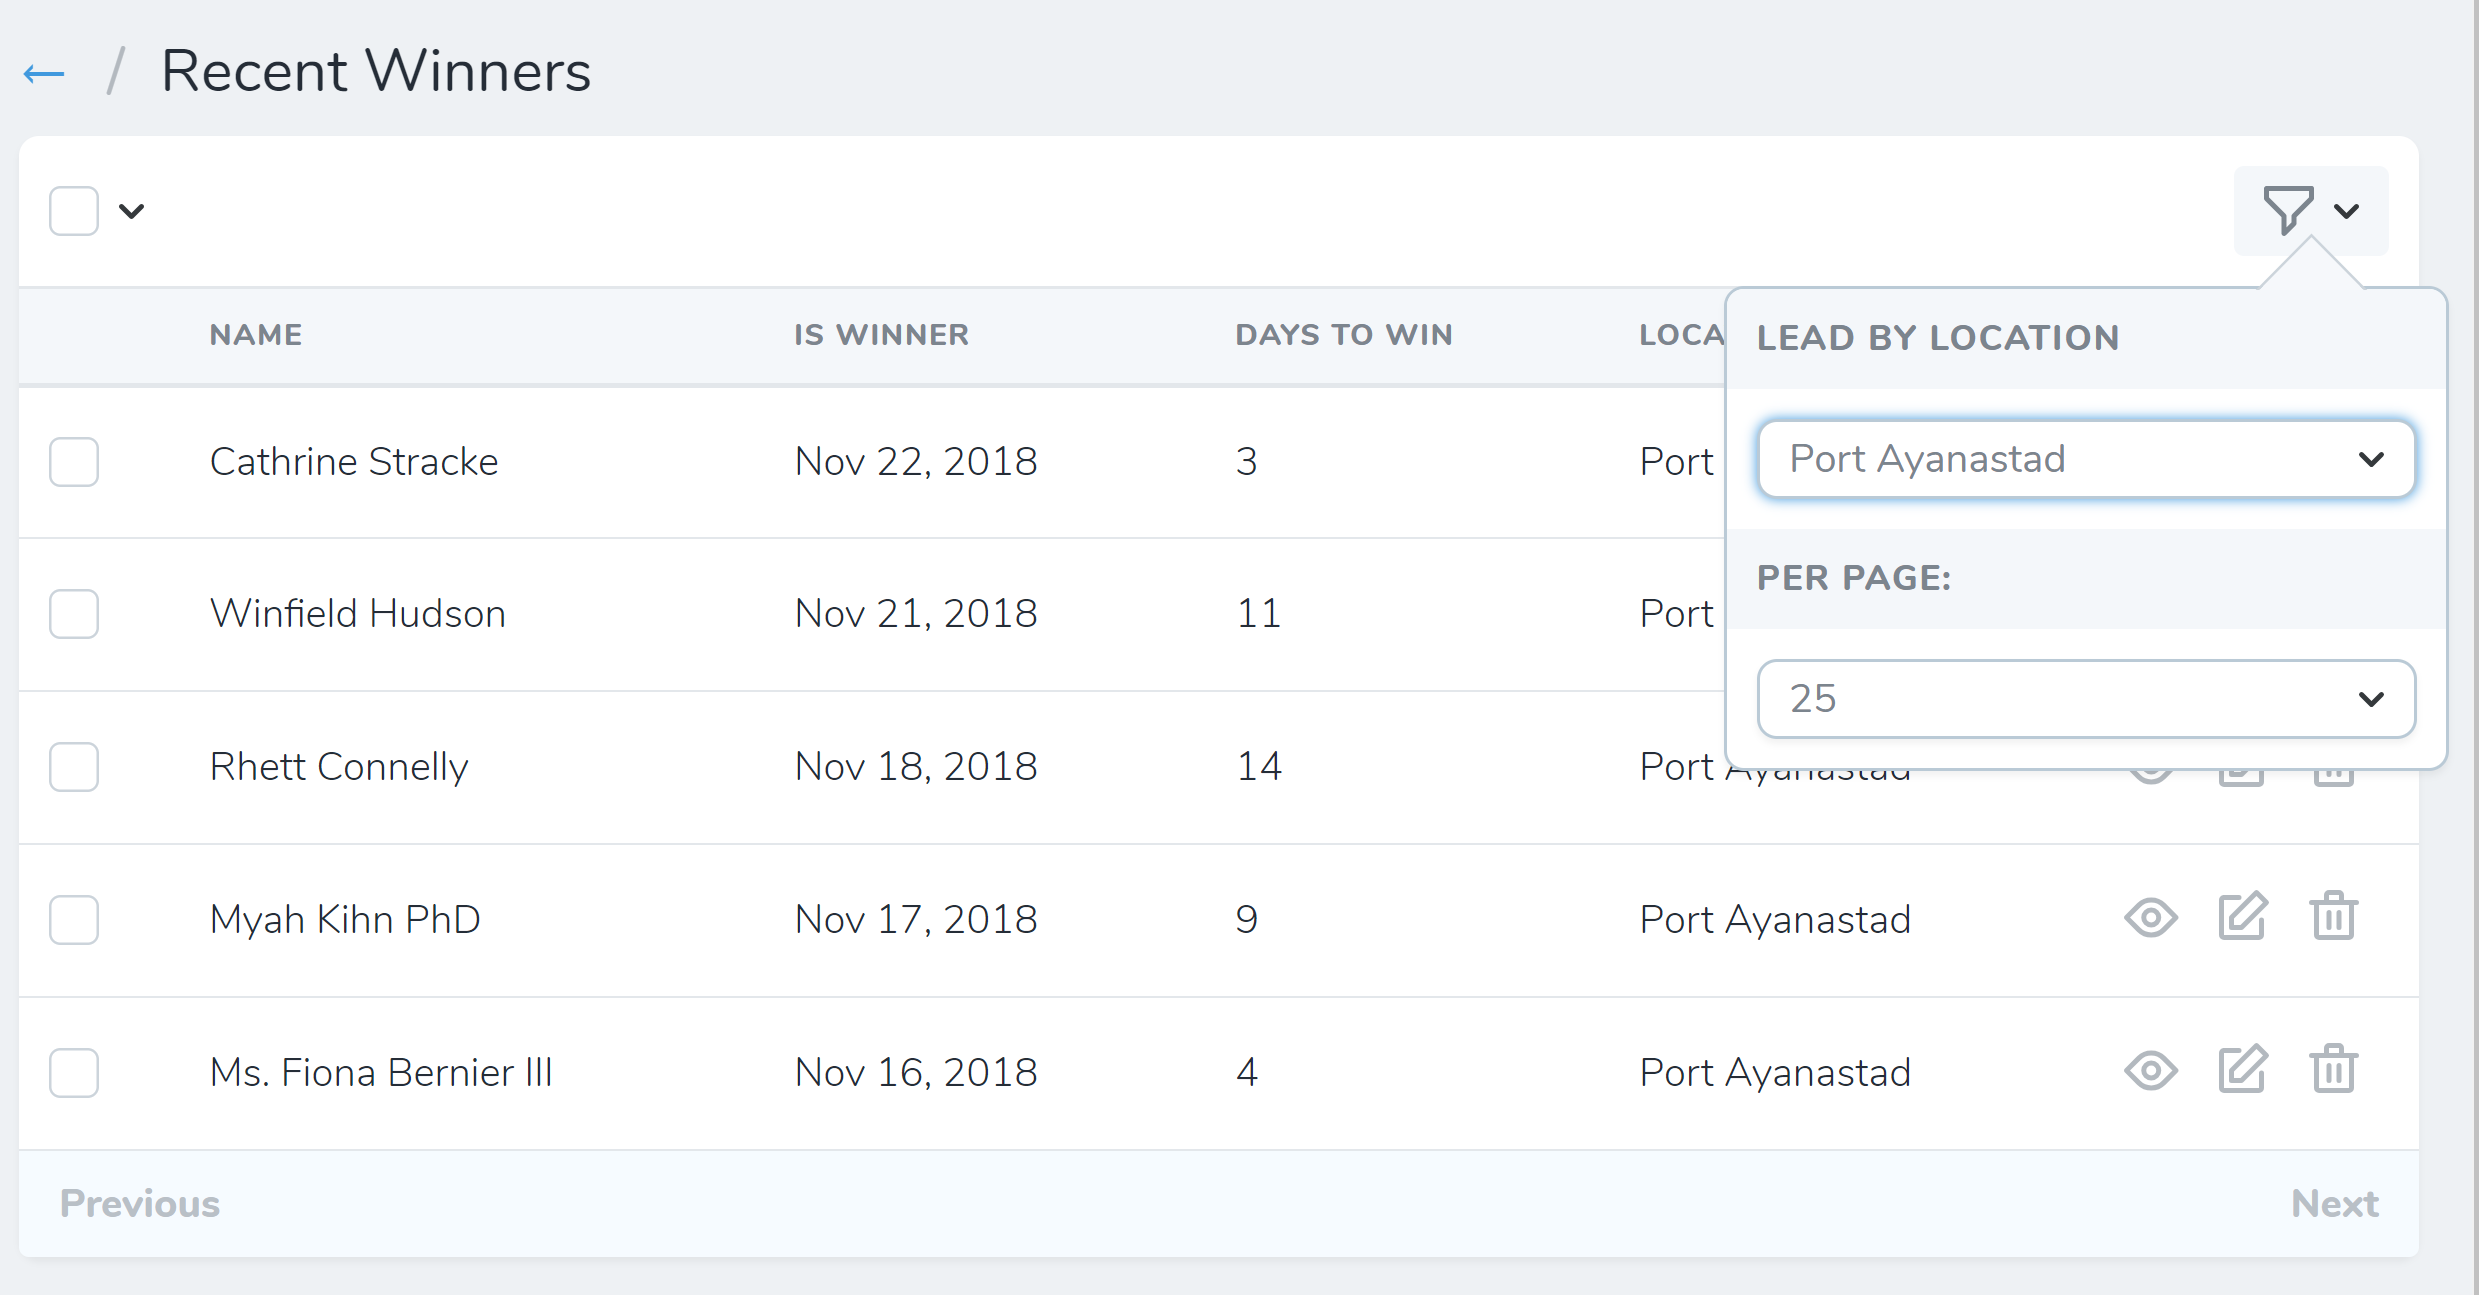
In the browser, navigate to the Leads page. You’ll see the special Lens filter dropdown next to the regular filters dropdown.
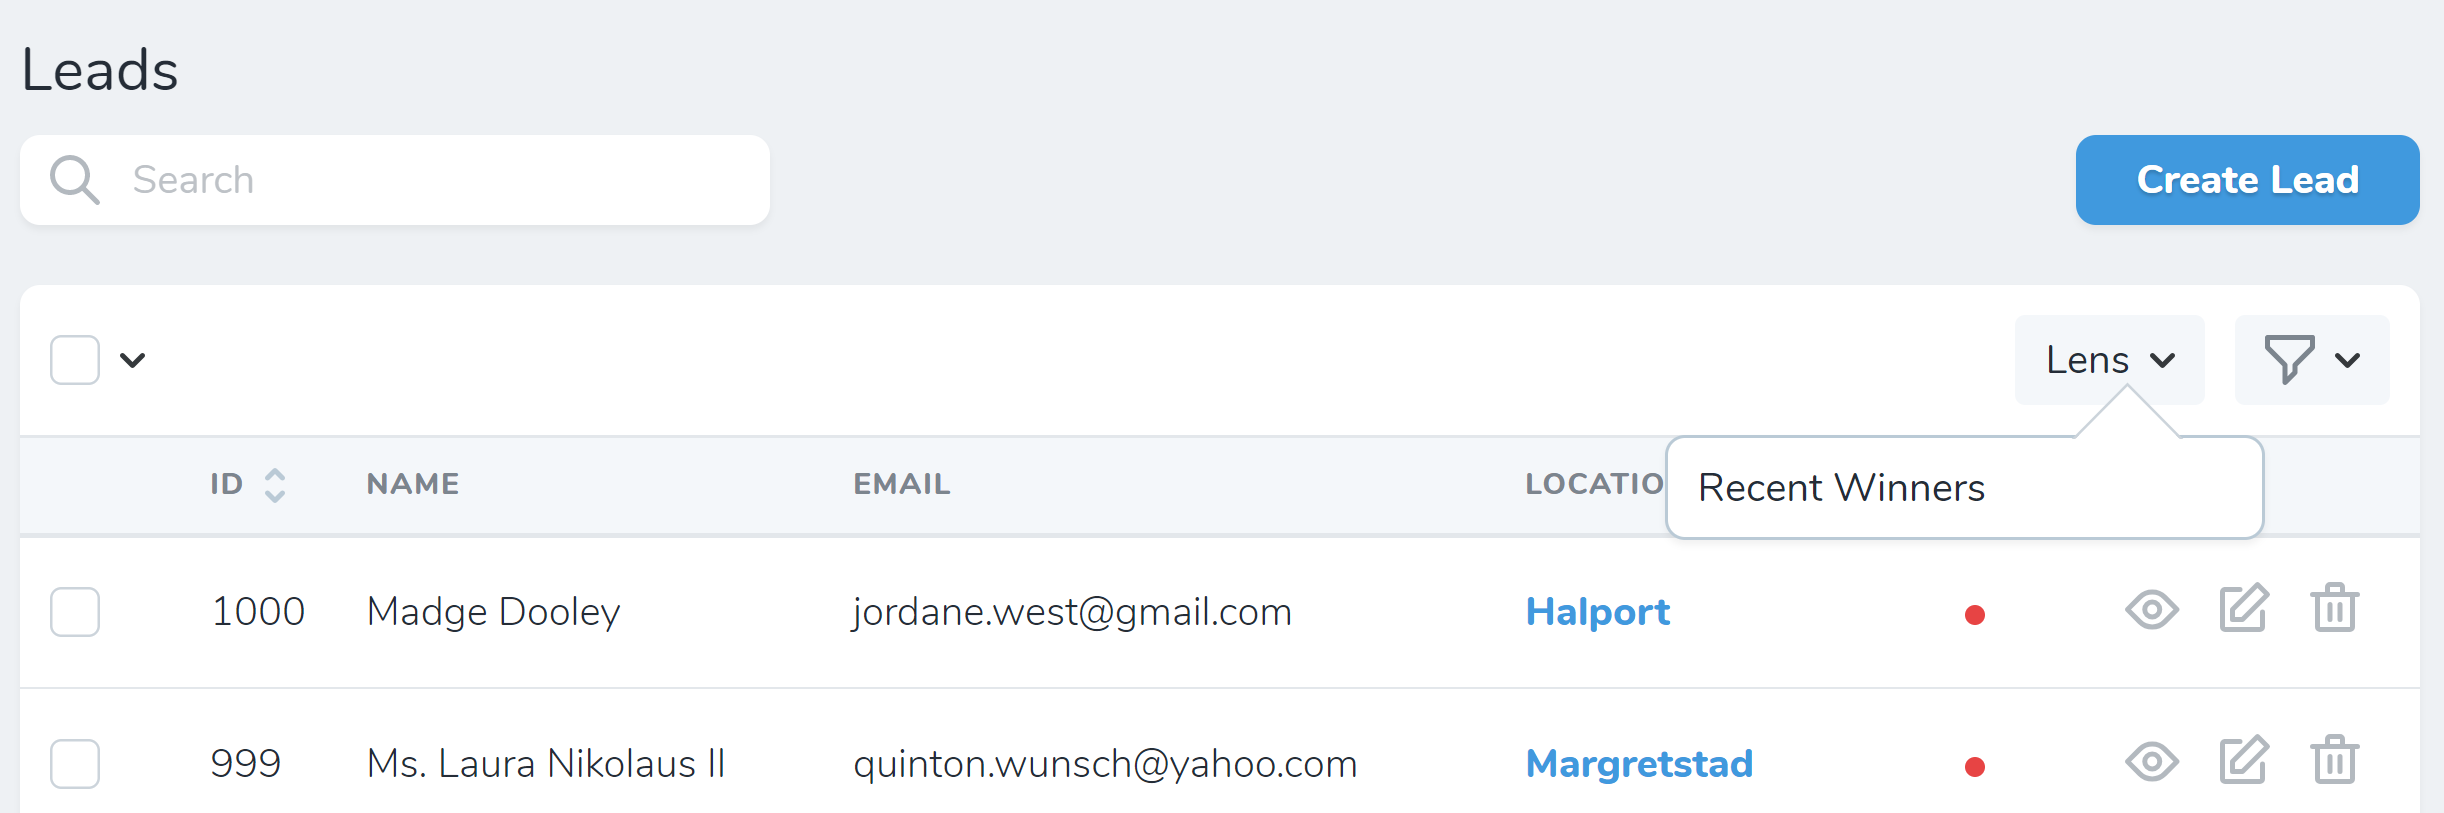
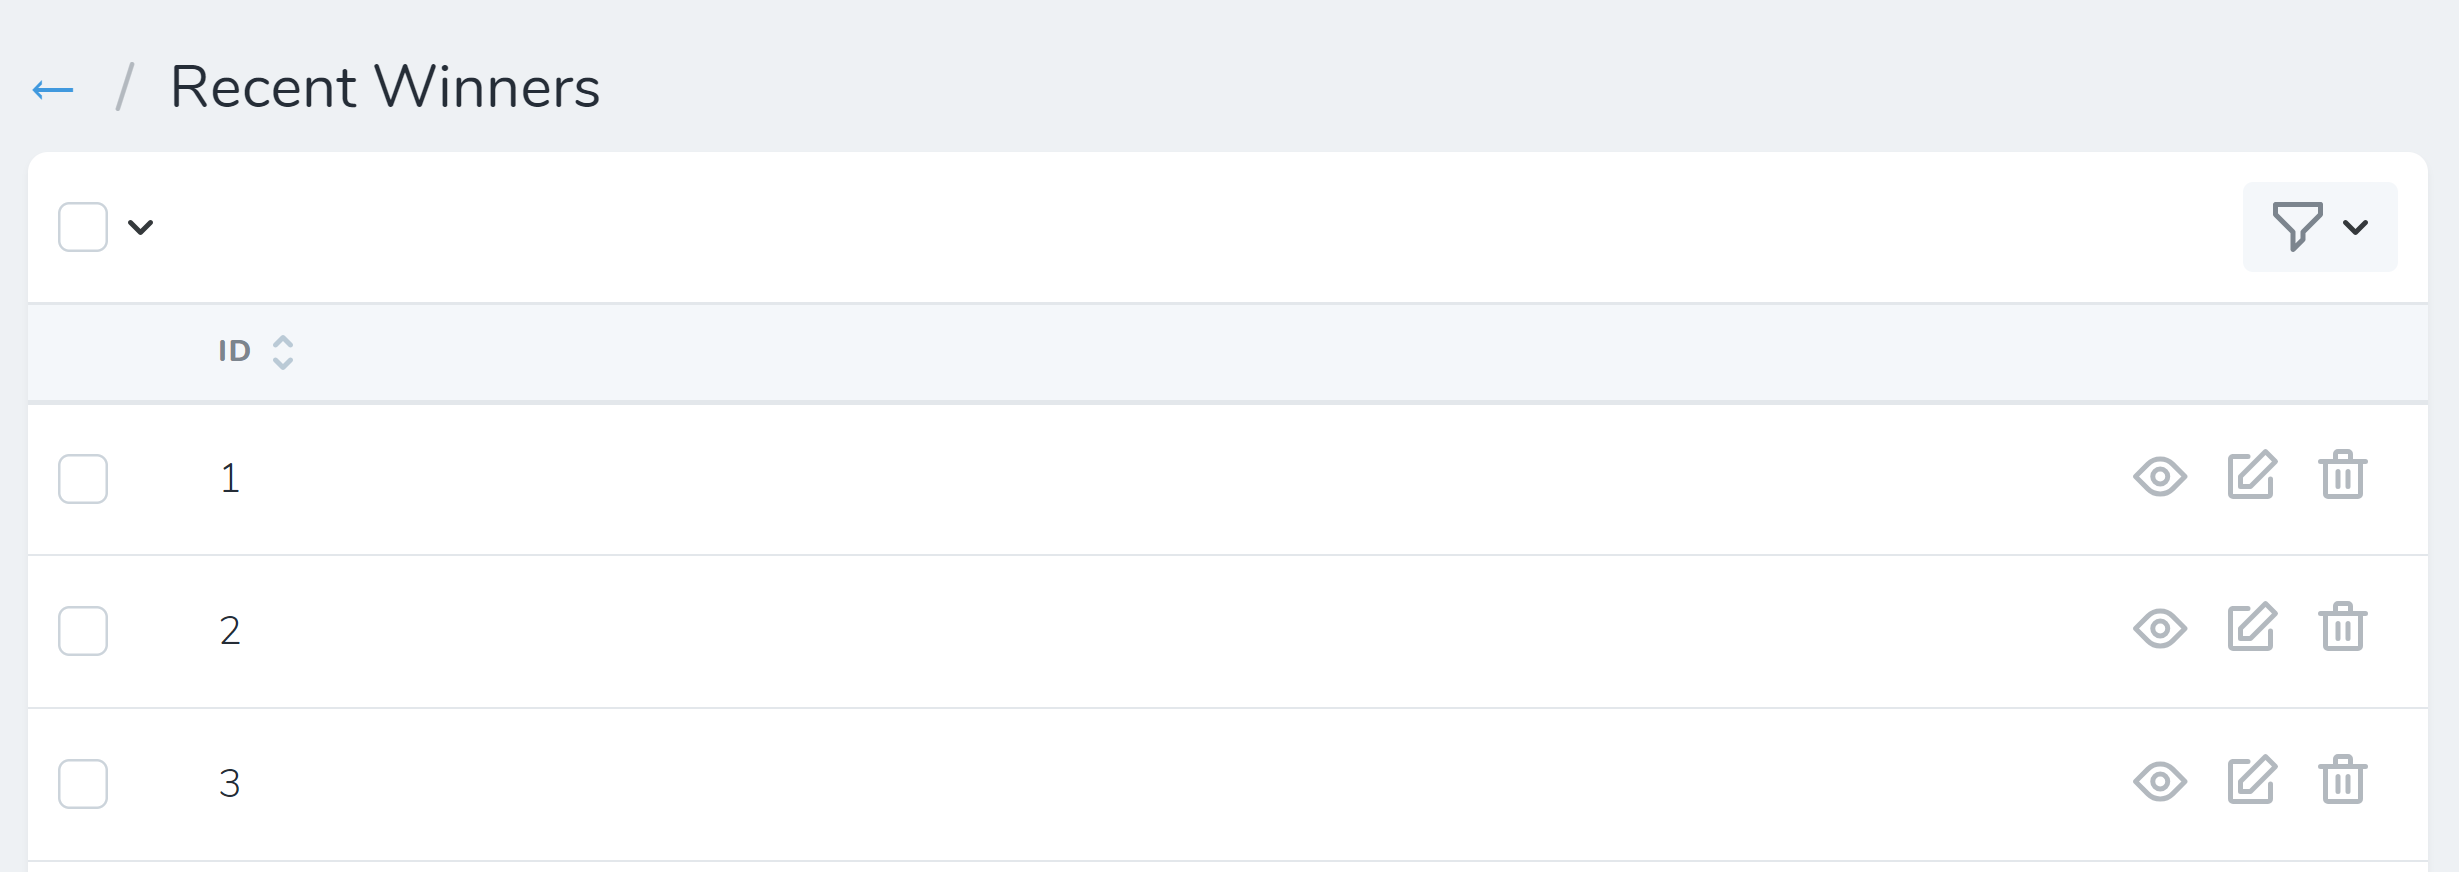
Select Recent Winners from the Lens dropdown. You now see a listing of all Leads by ID.
Let’s return to app/Nova/Lenses/RecentWinners.php and add some customization.
The query() method allows you to customize the eloquent results shown on this page. We’ll change the returned value to:
return $request->withOrdering($request->withFilters(
    $query->select([
        'leads.id',
        'leads.name',
        'leads.is_winner',
        'leads.created_at',
        'locations.name as location_name',
    ])
      ->whereNotNull('leads.is_winner')
      ->where('leads.is_winner', '>=', now()->subWeek())
      ->join('locations', 'leads.location_id', '=', 'locations.id')
      ->orderBy('leads.is_winner', 'desc')
));
This selects only leads who have won within the past week, as well as the location they won at.
Next add the fields we’d like to see on the listing page in the fields() method.
return [
    Text::make('name'),
    DateTime::make('Is Winner')
        ->format('MMM DD, YYYY'),
    Number::make('Days to win', function () {
        return $this->is_winner->diffInDays($this->created_at);
    }),
    Text::make('Location', 'location_name'),
];
Import the Number and DateTime field types:
use Laravel\Nova\Fields\Number;
use Laravel\Nova\Fields\DateTime;
Now refresh the browser. We see the the winners in reverse chronological order, just for the past week.
It would be nice to be able to sort the results by the number of days it took for the lead to win. Unfortunately, this is a computed field and Nova can only sort data by database columns.
We can, however, add additional filters to our Nova filter. For example, we could apply the same LeadByLocation filter that is attached to the Leads Nova resource to the lens. Do this by editing the filters() method to return:
return [
    new \App\Nova\Filters\LeadByLocation,
];
Now we can filter our recent winners by this filter.
Metrics
Nova metrics are pre-built cards that show data values, trends, and partitions. Let’s set up one of each type.
Value Metrics
Starting with a value metric card, generate the class using:
php artisan nova:value NewLeads
This metric will show how many new leads we’ve had for a given interval. The generated file app/Nova/Metrics/NewLeads.php has four methods. calculate() returns the data for the card. Let’s import use App\Lead; and update calculate() to return:
return $this->count($request, Lead::class);
The card will now show the count of leads created during a given interval. We could also have leveraged built-in average, sum, max, or min functions, or we could have done our own calculations.
The ranges() method returns an array where the keys are the number of days and the values are the written labels for those values. Out of the box, the metric comes with the following intervals:
30 => '30 Days',
60 => '60 Days',
365 => '365 Days',
'MTD' => 'Month To Date',
'QTD' => 'Quarter To Date',
'YTD' => 'Year To Date',
MTD, QTD and YTD are predefined and understood within Nova. For this example, let’s add intervals for one week and two weeks to the array.
7 => '1 Week',
14 => '2 Weeks',
The cacheFor() method allows you to cache the results of the metric for given duration, hooking into your Laravel caching driver. This prevents Nova from re-calculating the same metrics on every page refresh. We’ll leave this blank.
The uriKey() method lets us set the URI that the front-end will call to retrieve the data via AJAX.
Now that our metric is done, let’s register it to the Nova Lead resource index by opening app/Nova/Lead.php and updating the cards() method to return:
return [
    new Metrics\NewLeads,
];
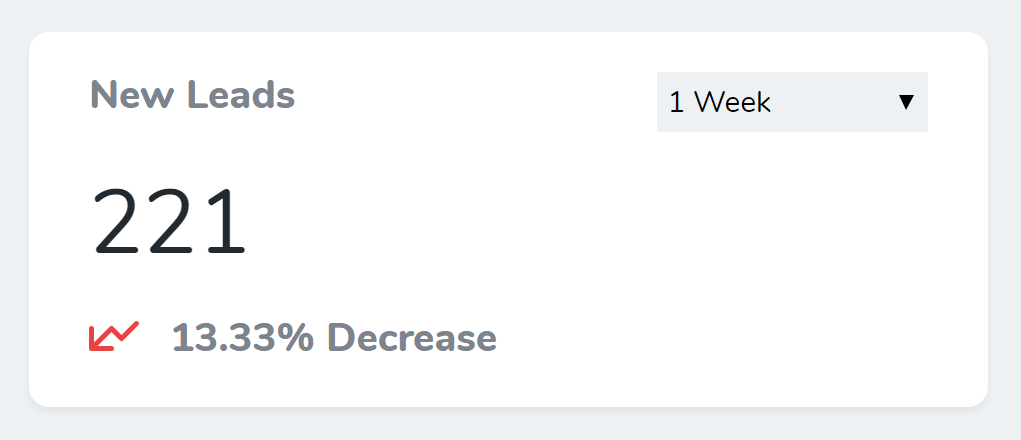
Return to the browser and refresh the lead resource index and we see our metric card. In addition to showing the number of new leads in the chosen interval, it compares that number to the number of new leads in an equally-sized previous interval.
Trend Metrics
Let’s create a daily trend metric to represent the same data regarding new leads.
php artisan nova:trend LeadsPerDay
Open app/Nova/Metrics/LeadsPerDay.php, import use App\Lead;, and update calculate() to return:
return $this->countByDays($request, Lead::class)->showLatestValue();
Now update ranges() to include one and two week intervals:
7 => '1 Week',
14 => '2 Weeks',
Lastly, register the metric to the lead resource index in the cards() method:
return [
    new Metrics\NewLeads,
    new Metrics\LeadsPerDay,
];
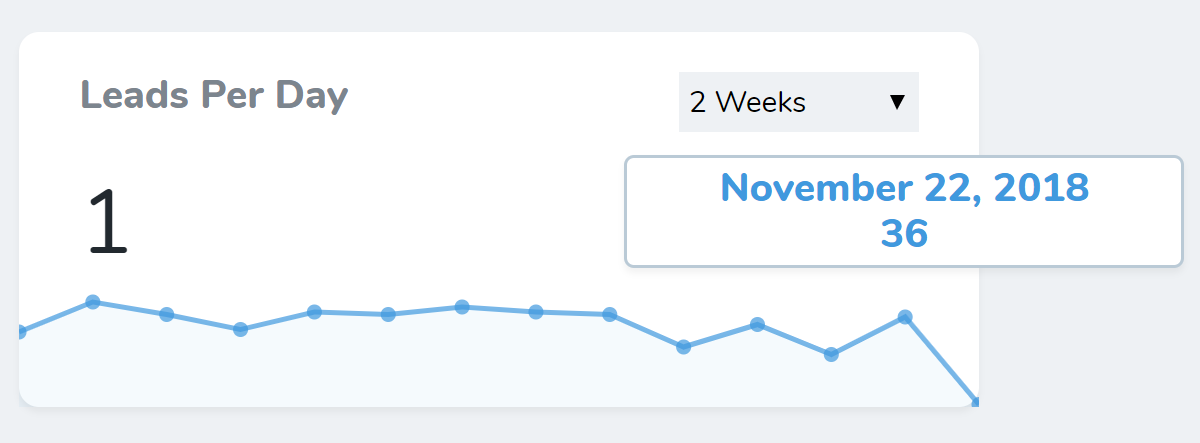
Refresh the Lead resource index to see the trend metric. Since we added ->showLatestValue() to the calculate() return value, the latest trend metric is highlighted as a single number. Hovering over any point reveals tooltips with more details about the data.
Partition Metrics
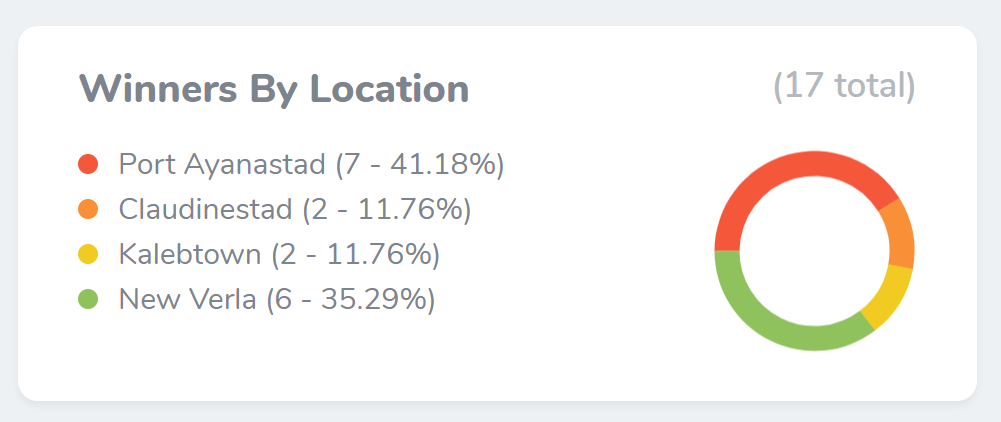
Partition metrics are used to show pie charts of multiple values that add up to a whole. For example, we could see what percentage of winners have come from each location. Since it’s difficult to see 10 locations in a pie chart, let’s only consider the first 4 locations for this example.
Begin by generating the metric class:
php artisan nova:partition WinnersByLocation
Open app/Nova/Metrics/WinnersByLocation.php. For this metric we need to count winners, which is a subset of Lead model objects. This means that Nova’s pre-built function for summing the Lead objects won’t give us what we need. Fortunately we can calculate this ourselves.
Begin by importing the Eloquent model:
use App\Location;
Now enter the following into the calculate() method:
$locations = Location::with('leads')->take(4)->get();
$data = [];
foreach ($locations as $location) {
    $data[$location->name] = $location
        ->leads()
        ->whereNotNull('is_winner')
        ->count();
}
return $this->result($data);
This takes only 4 locations and creates an array where the keys are the location names and the values are total number of winners for each location.
Lastly, since we can attach this metric to any Nova resource index page, let’s attach it to the Locations resource index. Open app/Nova/Location.php and update cards() to return:
return [
    new Metrics\WinnersByLocation,
];
Navigate to the Locations resource index to see the metric.
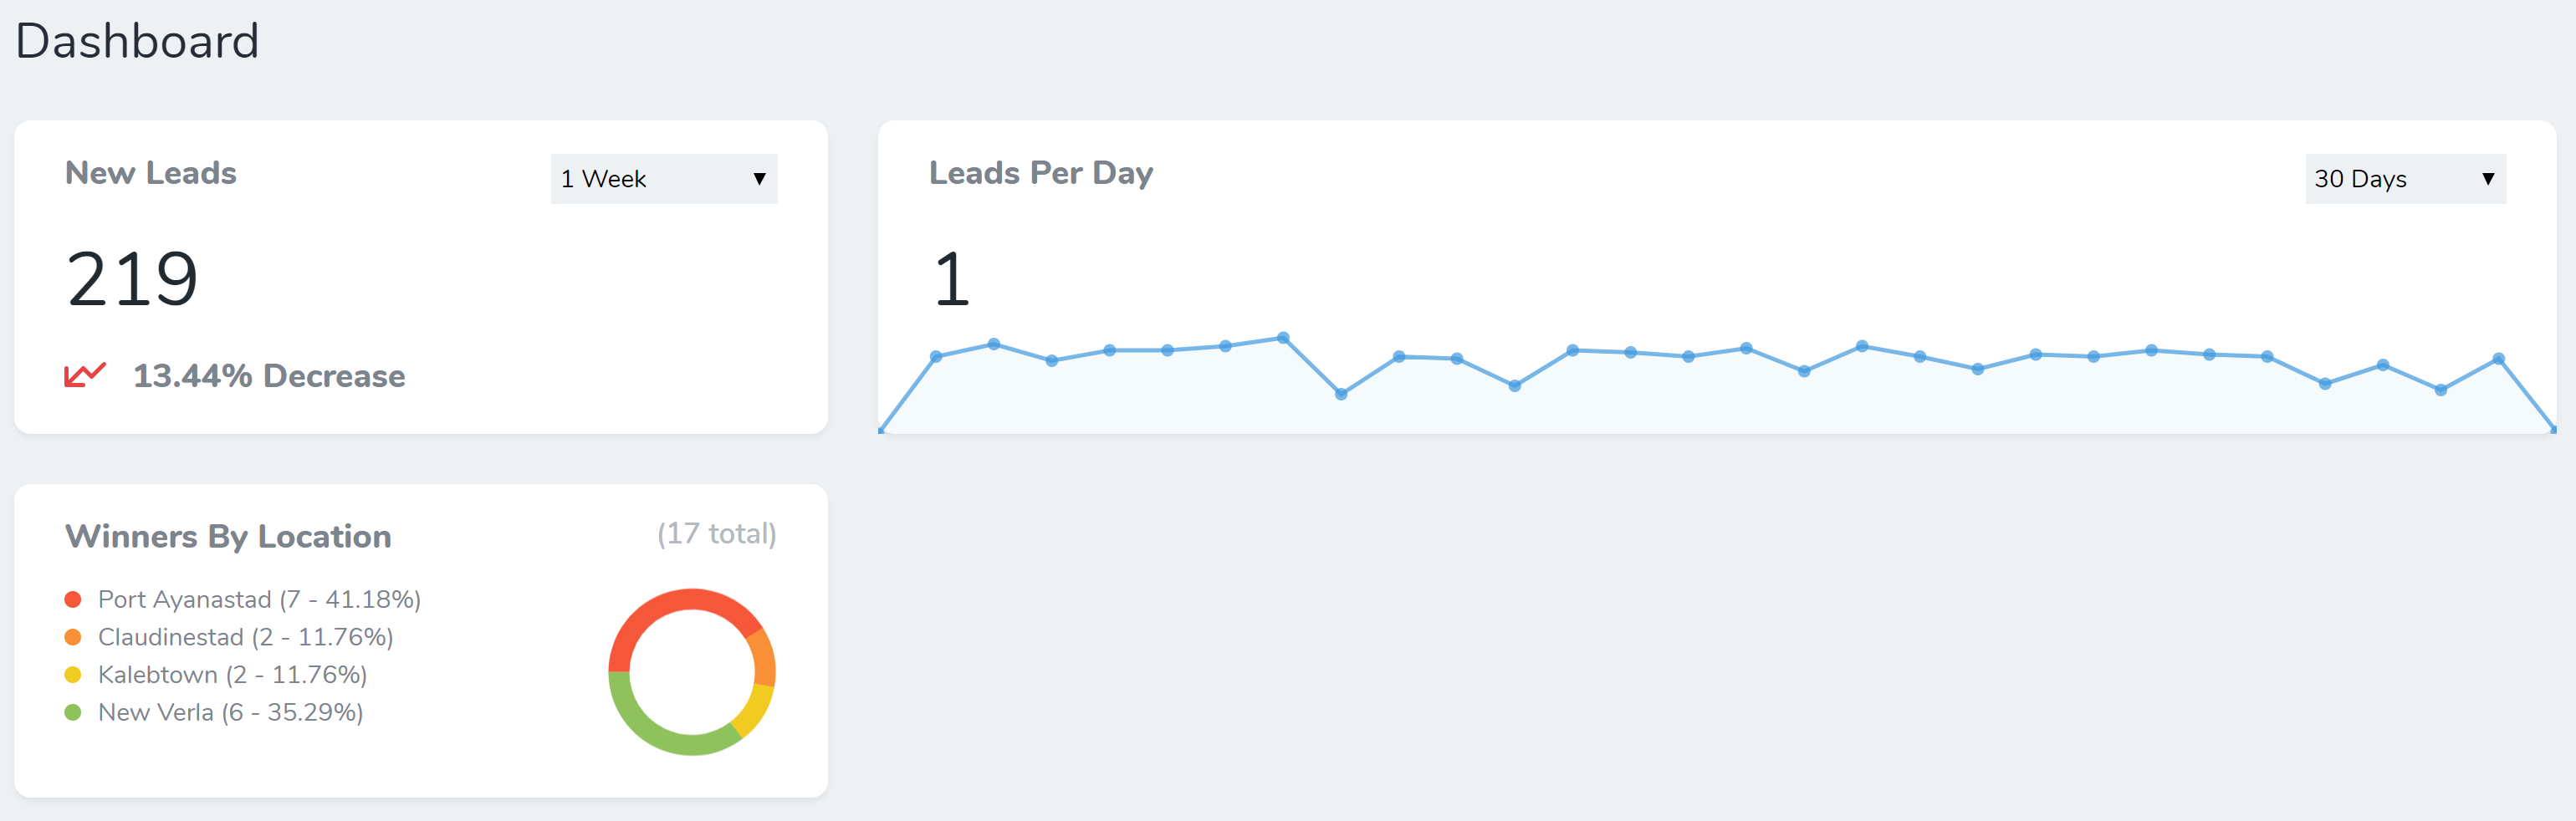
Attaching to the Dashboard
Perhaps some of the metrics are really important and we’d like to show them on the Nova dashboard. Out of the box, the Nova dashboard shows several help-related cards. We can change this in app/Providers/NovaServiceProvider.php in the cards() method. Remove the Help card and add in our metrics. To change the size of a metric, chain the ->width() method like so:
return [
    new NewLeads,
    (new LeadsPerDay)->width('2/3'),
    new WinnersByLocation,
];
Refresh the Nova dashboard in your browser and you now see your metrics.
We’ll look into attaching other kinds of cards in the next post titled Part 4: Customization (coming soon). We’ll also cover Nova customizations by building our own tools, fields, and cards.